AAA Cards DT: Mood board + snow

This is my first post for AAA Cards, a clean and simple card design challenge blog. I joined the design team in January and will be posting inspiration cards bi-monthly (twice a month). Apparently, bi-monthly is both every two months and twice a month! Is it any wonder students find English difficult to learn?

The first challenge this year is a mood board (reproduced below) with the optional extra theme of ‘snow’. I took my colour scheme from the pic with the skier and the theme from the snowflake. It’s never too early to make a card for Christmas…

Continue reading

Altered Art: What do you see in the mirror?

I had the privilege of hosting three of the church’s young people’s group (in other words ‘yoof’) last night in The Studio. We had two hours to work on a project, so I rummaged in my ‘for altering’ drawer and lifted out some Ikea Malma mirrors that were collecting dust. I also dusted off a technique I learnt years ago and came up with an altered art project.

altered art mirror Continue reading

Art Journals: using acrylic covers

I was on Hochanda this week demonstrating techniques for using the acrylic covers effectively, for the A4 and A6 journals from That’s Crafty!. As always, there is too little time on air to fit in all my ideas, and only just enough time to fit in all I had planned! What follows below are photos and quick explanations of how to do your own. I really need to remember to take step-by-step photos as I make so that I can do a proper tutorial post! First is an unbroadcast cover, then the mirrored cover that didn’t go so right when rushed, and last for this post is the bubbling water effect shown in my first hour.

  • Peel off the protective film from the reverse of the cover
  • Work on the reverse side for all the following steps
  • Place the snowdrop stencil in position and fill in using Posca pens
  • Dry, then place the TIME stencil upside down and sponge through ivory paint
  • Dry, spritz with gold mister, dry
  • Meanwhile, print texture stamps onto large Rizla papers using Chartreuse archival ink
  • Heat set the ink, then using decoupage glue/multi medium glue overlapping layers of the printed papers
  • Once dry, any paper over the edges of the cover can be sanded off

  • Peel off the protective film from the reverse of the cover
  • Working on the reverse, add alcohol inks until you are happy with the coloured layer
  • Place the JOURNAL stencil upside down and sponge a layer of Jet Black archival ink through onto the alcohol ink
  • Remove the stencil and then rub away the black in with a clean cloth/kitchen towel
  • Repeat inking steps if you want to remove any more of the alcohol ink
  • Now spritz with a water-based varnish (e.g. Pentart spray varnish) to seal the ink
  • IMPORTANT: allow to fully air dry, do not heat. Repeat varnish layer
  • Spritz with Pentart Mirror Mist and heat dry immediately to stop the mirror mist weakening the varnish beneath
  • Seal the mirror mist with the same varnish and finally apply a layer of black acrylic paint
  • Peel off front film to reveal your results

  • Peel off the protective film from the reverse of the cover
  • Working on the reverse, and using the word stencils the wrong way up, sponge your main colour onto the acrylic; heat dry and repeat directly over the top.
  • Next, sponge your shadow colour through the same stencil, slightly offsetting from the first colour
  • For the water effect, first dilute some white gesso/primer
  • Working quickly, cover the whole sheet with a layer of watery paint and then dab isopropyl alcohol into the wet paint – it will push the paint away and start the effect
  • When you are happy with the effect, heat dry in a well ventilated room
  • Repeat with a light shade of blue, and then another darker shade of blue
  • This technique will work over any sealed surface, but does rely on the paint being thinned and still wet
  • Try adding text to the front of the cover as well, this time starting with the shadow colour and working over the top with the main colour

Bonus post

Later this week I will do a separate post explaining my ‘now-you-see-me-now-you-don’t’ technique that was a wee bit rushed at the end of the second show:

Continue reading

Stained Glass Window Arch – for That’s Crafty!

Following my TV appearance a fortnight ago, I do apologise for not getting a tutorial done earlier as I promised – I came down with a humdinger of a cold the week following the shows. Between the lethargy, the laryngitis and other stuff, I didn’t get to do what I wanted in The Studio. ‘Tis done now though, so grab a cup of your favourite beverage and start reading!

stainedarch

I thought I would show you how I created my stained glass window arch using the fabulous Arch Upright from That’s Crafty! since I didn’t get the chance to show it off on air. Mixing different types of ink (alcohol and Distress) and paint, and making full use of a Dinky Stencil, this window brings together a number of techniques to complete a mixed media mediaeval masterpiece!

Continue reading

Art Journal Page: Simply Marvellous

IMG_6264_wAnother journal page using my new wooden block stamps – they work so well with the Dylusions paint. It’s just the right consistency to cover the stamp, stick to the page, and not squidge everywhere. Unfortunately it wasn’t quite the same when I used rubber stamps, which squeezed the paint away giving me the tramline outline that I then had to fill in with a paintbrush.

Continue reading

Scent-sational Apertures (for Creative Expressions)

Perfumes Also in my DT pack this month are two more Singles stamps featuring cut-glass bottles or perhaps they could be decanters – Crystal Cut and Murano Glass. Both are two stamp sets – the bottle and a ‘scent-iment’. I wanted to highlight the glass element, so created two cards using apertures and acetate. Clean and simple designs, they show off the stamps wonderfully. Oh, and don’t make the same mistake as me: remember that the image on the front of the pack is not actual size… That’s how I ended up with the ‘close up’ in the aperture!

Continue reading

Autumn arrives…

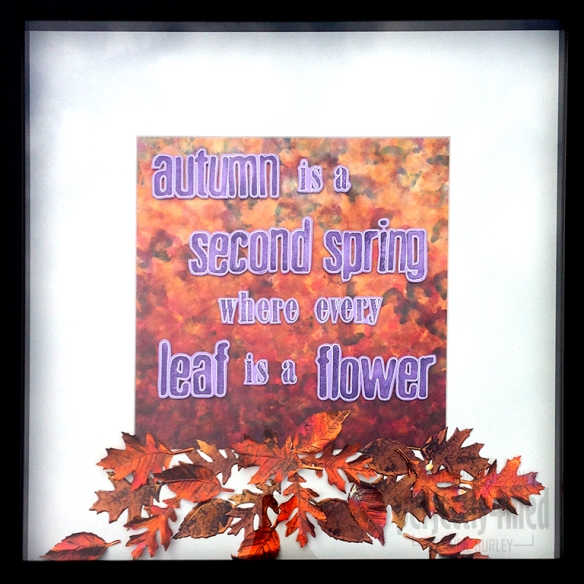
Autumn arrives

It’s officially autumn here in the UK, and on cue, the sun has disappeared, the temperature has plummeted and the rain is thrashing down! I’m having a go at getting on the Creative Expressions Design Team, and submitting a last minute entry to their design team call which closes today. As part of the application, I had to create a piece on the theme of ‘autumn’ and spent Wednesday making this piece. It’s in a 50cm square frame and features a 12×12″ alcohol inked glossy background, stamped and heat coloured embossed copper leaves and stamped and outlined lettering. For more making details, read on!

Continue reading

Multi-Ink Tag – Twelve Tags for 2012 – October

I appear to have forgotten to post that I’ve created my tenth tag for my Twelve Tags of 2012 series, featuring the flower of the month, Calendula. Or at least my approximation of it! And I’ve learnt to use my new camera and MovieMaker to do a ‘how to’ video as well. Please let me know what you think!


[youtube=http://youtu.be/NyeP7octFCw]

Juice Carton Card

20110618-024828.jpg

I’m teaching my card project today in Leicester – and I think this may be another innovation… For the squares on this card, I’ve cut up a juice carton (the foiled type Tetrabrik) into 3.5cm squares before embossing using a Big Shot and Fiskars texture plates and then colouring with alcohol inks and mounting onto black cardstock. I took off the ink with a cut’n’dry nib soaked in blending solution, and outlined the areas with a black permanent fine tip marker. The ‘leading’ is Pewter Liquid Pearls from Ranger. Recycling at its best!