Stone carving… with a scalpel?

As previously mentioned, I’ve just completed my level two training in the use of Powertex and their Stone Art product. I was considering what I’d learnt, and decided to attempt another piece to test a concept I’d had an idea for…

And I think the concept works really well – I just need to tweak the colouring a little, but the carved lettering was really quick once the outlines were traced on to the ‘stone’ and with a sharp scalpel, there was minimum effort and mess. The pencil and brushes were added as an afterthought and were just as easy to ‘carve’ into the stone. I’d love your commissions for carved signs and just about any shape and size is possible! And postage shouldn’t be prohibitive… the sign is stuck on with double sided tape!


Powertex Certification continues…

I spent yesterday getting more training in the use of the versatile fluid hardener, Powertex. This time we concentrated on ‘Stone Art’. Given that there isn’t a single grain of anything even vaguely resembling stone in the project below, it’s a very impressive product!

Powertex Stone Art - first projectThe base is the heaviest part of the project, and also likely to be the only part that isn’t weatherproof. I took the opportunity to get a stack of materials into stock (and find somewhere in the studio to store them!) so I’ll be playing some more as I get some samples ready for workshops later in the year. Thanks to Brit for another cracking training session.


Seasonal Colour Palette – Dove of Peace

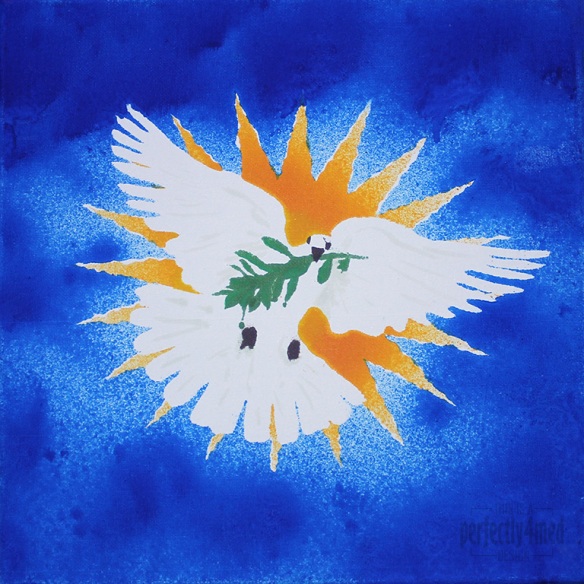
I like a challenge… and I like it even more when I get inspiration, have the materials, and more importantly can snatch a moment to get the piece done. So it is with some delight that I share with you my entry to the Ranger Ink ‘Seasonal Color Palette’ Challenge: to create any project using the theme colours based around the Adirondack Color Washes in Butterscotch, Meadow, Espresso and Sailboat Blue. It’s a 12×12 inch canvas:

Color Wash Dove

From concept to final outcome took approximately 3 hours, with only two hours of hands-on crafting. I started by using Adobe Illustrator to produce an outline of the starburst, dove and olive branch, printing it out four times. Each copy was then sprayed with fixative spray to seal it, which stopped the colour wash bleeding through. I cut out the various items to produce stencils – the central outline, the eyes and beak, the branch, and then the starburst ‘prongs’. I used repositionable spray glue to coat the back and adhere the stencil firmly to the canvas before spraying each of the colours on in turn, using a heat tool to dry and heat set between colours. Aside from a bit of overspray and bleed, and a little stencil misalignment, I’m quite pleased with the result. I did a little touching up here and there with some of the Distress Paints, which may be hard to see as they picked up some of the dye layers beneath.

Playing with PanPastels in a new art journal

One of the benefits of working at the NEC during a craft show is nipping off during breaks and spending money on new materials. This time I went mad and treated myself to the 20-colour PanPastel Portrait Set, mainly for my life drawing work at college obviously. However, I do need to get used to them, so last night I played with them, setting down dry wash backgrounds in a new art journal that I’m dedicating to work with pastels. A quick spritz with fixative spray and here’s how it went:

I love the vibrancy of the pigment-rich colours, and found that they played nicely together when swiped over with any of the tint colours – until then, there wasn’t that much interplay between the colours, but I may have been a bit stingy with the initial application. I applied the PanPastels using a large Sofft sponge.

Christmas Stained Glass

I’ve just posted my latest WOW! Embossing Powder project over at the design team blog. I learnt quite a lot about embossing powder onto glass! Follow the link to also learn how I managed to take a photo of a mirror without being in it…