Now Level 3 Certified Powertex Trainer…

I spent a day with the fabulous Brit once again, learning how to paint with Powertex. Here are the results of a few hours work. Workshops are destined to follow fairly soon as these techniques are fast and great effects easily achieved:

Both techniques concentrate on building layers and texture, with pigment powder highlights. The figures and stones are made from Stone Art/Powertex clay. With practice I think my figures will be a little more uniform – I was going for the slightly more abstract elongated appearance, honest! Sizes – ‘African scene’ – 40x50cm, ‘Stones’ – 40x40cm.


College Course – Term 6 – Final Exhibition

Where has two years gone? Seems to have flown by! And so, I come to the close of my course, and here are the pictures of my final exhibition. I have studio pictures of the final pieces to post as well, and they’ll come in due course. I’ve used a bit of Photoshop jiggery-pokery to get some of the detail right in the exposures, but the light level on the day was more the dome pic than the globe pic (i.e. not as dark as I’d like, but hey ho!).

Keep an eye out for the individual pieces as they will be for sale, complete with free light! I don’t have enough room to store them or display them, so it’s only right they should find a new loving home 🙂

College – Term 5 – Final Major Project – Paper crafted light shades

It’s already March, and only two weeks before we finish Term 5. One more term to go, and that’s my college course done and dusted. If it weren’t for my new studio to look forward to working in, and the list of jobs to do in the house, I know I would be dreading the end of college. Though I was unwell last week, I did carry on with my final major project. It’s grown out of looking at Islamic geometric patterns – I’ve learnt to construct geometric shapes with a compass and ruler, transferring them into Illustrator, and then finally applying them to 3D polyhedra. I settled on a truncated cuboctohedron as my main construction, and played about with various construction techniques.

Here are just four of the anticipated dozen final pieces. Some are uninspiring in daylight, but come alive when internally lit. Others inspire in both lights. I can tell you that I got a blood blister in my finger tip from all the scoring of folds. I can reveal that the shadowfold light required 360 separate knots. And that I stuck down each of the 400 petals on the frilly one! All are handcrafted (though I did use the Cricut machine to cut out the shapes to my design!) and nothing more than fabric or paper and glue. They are roughly 6-7 inches in diameter and designed to sit over an inexpensive battery powered LED light (£1 for two in Poundland!).

Handprinted Quilts

I’ve just put the finishing touches to two small quilts. They both feature my own pattern design, which I hand screen printed at college onto fabric offcuts using black textile ink. The first shows the patten, unadulterated, quilted using black cotton and free motion machine stitch round each of the circle motifs. The second is dyed with Adirondack Color Wash sprays (which despite my best efforts still covered everything nearby!), dried, heat set, rinsed, ironed and then quilted in the same way. Both are hand bound and labelled. I use backstitch to hand sew labels for my quilts as this is unlikely to wash off! They are both 22.5″x42″ in size.

When you can’t get leather… try grungepaper!

Hi – this morning has been spent on a commission. I have been asked to wear something I have made using WOW! Embossing Powder when I’m demonstrating at the NEC next week [Hobbycrafts Exhibition, stand M12-15]. Though I didn’t immediately dismiss necklace or earrings, I didn’t think I’d enjoy the ear lobe crushing of a clip on, and necklaces just dangle in the melt pot… So I came up with two ‘man bracelets’:

Both bracelets are made from grungepaper coloured with Vintage Photo and Walnut Stain distress inks, embossed using Tim Holtz texture fades embossing folders, stuck down with Studio matte multi medium. Sewing reinforces the whole thing and the fastening is a Tim Holtz copper hitch. Bracelet 1 features the new WOW! Special Edition Embossing Glitters (Caribbean Jewels) due to be launched at the NEC. Bracelet 2 (The Other Wrist) features the WOW! metallic embossing powders. Grungeboard would work as well, but I didn’t have a size that wrapped round my wrist!

Drypoint print – the gallery editions

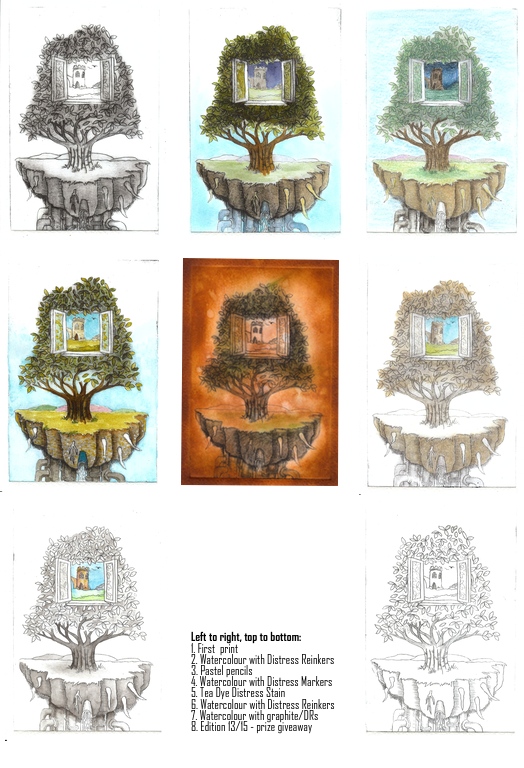
As I mentioned in my original post, I planned to further work on my drypoint prints, adding tone and colour. Here is a gallery of the results – and the bottom right is the print I have given away, number 13 of 15 – and may be the winner will want colour added? Most of these are now mounted for the end of term exhibition. There are some other prints available to purchase if you’d be interested…

I think some work better than others – I’m not happy with the tea dye one, it’s too dark. I am happy with the greyscale/monotone trees with the colour window. The pastel is very much in keeping with Jacek Yerka’s work on which this is loosely based as he prepares his paintings with a pastel version first. Let me know what you think 🙂

Dabber Resist Mixed Media Canvas

One of the techniques taught in the Creative Chemistry 101 class with ‘Professor’ Holtz was a dabber resist – taking advantage of the fact that acrylic paint is waterproof when dry. Here’s a canvas I put together over the bank holiday weekend making use of the technique, and how I did it follow after.

Continue reading

Photography – Term 2 – Final Image

Another part of my Extended Diploma in Art & Design course is a photography block. This term’s work followed the theme of ‘manmade’ and the challenge was to incorporate some of the items we’d drawn over the Christmas break into a digital studio photoshoot, followed by image manipulation in Photoshop. I chose to use a manual coffee grinder as that had been the most interesting shape to draw, and my imagination took me off on a flight of fancy – so I emptied the cutlery drawer and with a bit of jiggery-pokery, I came up with this:

If you would like your own photographic quality print of this image (without the copyright notice) then please contact me using the email button in the sidebar.

Quilt No. 2

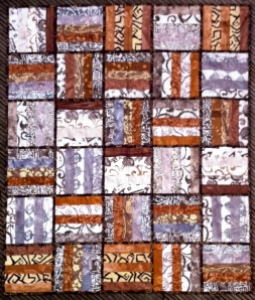
So buoyed up by my first patchwork quilt, I embarked on my second – and bought a new sewing machine (Pfaff Quilt Expression 4.0) as well! This is a quilt-as-you-go jelly roll rail fence pattern, as described in Popular Patchwork magazine (p.31, September 2011). I chose a batik fabric jelly roll from The Fabric Guild. The binding strips are a Hoffmann print, and the backing a dark brown batik double-width cotton, also from The Fabric Guild. Wadding is 80/20 cotton/polyester.

Apologies for the quality of the image – I’m finding photographing large quilts quite tricky! It is 52×61 inches in size, and is for sale – here’s the listing on eBay!