I previously posted an advert for October’s workshop in The Studio featuring an altered MDF tealight holders Now, it’s that time of year when the church Christmas Fayre is just ten days away. I still have a box full of holders left over. So, over the last couple of days I’ve been sponging acrylics, metallics and glass paints over MDF and acetate and waiting for spray gloss varnish to stop being tacky. I’m now making bespoke packaging for each of these individual gifts:
Tag Archives: letraset
Never Been Used: Spider Mum Stamp
I’m sure I’m not the only one that has a section of stash that has never been used. Shocking, I know. I have to admit my never been used pile is relatively small – but I have a lot of stash, so there’s actually a fair number of items in it! This situation is not good. Happily, I keep stamps out of the drawer until I have used them in a project and as the pile is growing, I thought I would do something about it.
So I’d like to introduce you to a new hashtag: #nbu – never been used. If you too would like to rise to the challenge of raiding your stash for something that you have never used so far, make a project with it and share the fact that you have one less thing that has never been used, remember to tag it with #nbu. Then we can all share in your success!
Here’s my inaugural never been used project. I have several Stampendous Jumbo stamps in my unused pile, and this is the first to be used – Spider Mum. I’ve stamped in Jet Black Archival onto watercolour paper and then coloured with Letraset AquaMarkers. The border is heat embossed with WOW! Superfine White Pearlescent EP.
Blue Hues in a Can
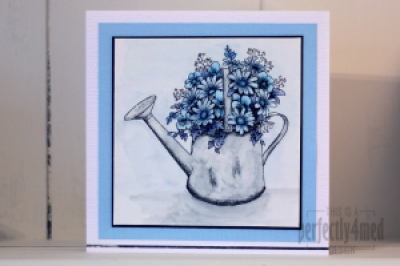
It’s a ‘Favourite Colour’ theme over at The Crafting Cafe, and I decided my favourite colour this month is blue, and used the fabulous Floral Watering Can from their sponsor Delicious Doodles for my base image. I recently fell in love with Letraset AquaMarkers, bought the entire set, and played with them some more for this card.
I started by printing two copies of the image onto 90gsm watercolour paper using my laser B&W printer. I added AquaMarkers to the crosshatched areas of the design (as these will be the darkest) and dragged the colour across the rest of the space with a waterbrush pen. I added extra layers of colour where needed by allowing the first layers to dry before painting on colour picked up from a palette (draw on a plastic sheet with the AquaMarker). That’s how I built up the mottled watercolour effect on the can and the shadow.
For added depth (not easily seen on the pic) I coloured in the second copy and cut out selected items, edged them in black and layered them decoupage stye onto the flowers. Try to choose things that aren’t overlapped by anything else and you’ll get the foreground elements perfectly.
Pens used:
Can – Pebble Grey
Flowers – Deep Sapphire/Storm Blue/Vintage Blue/Mediterranean
Background – Pebble Grey/Frost Blue
Mounted on black card over Bazzil on 14x14cm ‘linen’ style card. The metallic strip at the bottom is by Letraset and helps ground the image.
Let me know if you’d like a more in-depth/video tutorial on using AquaMarkers. I think they’re fab!
Letraset Neon Markers – review
I’ve just received a complimentary set of the new Letraset Neon Markers (6 set), on sale from 1st September 2012. According to the information sent with them, they are twin tip fluorescent markers offering water-based pigment ink which is lightfast and ‘perfect for adding vibrant highlights to art and design work’.
I decided to put them through their paces. Firstly – colour on white, and then because they are pigment inks, on black too, and across text:
Allowing for poor colour reproduction of fluorescents, the colours are what you’d expect to see on white – vibrant and in your face. The ‘spark red’ isn’t all that sparky, but I guess it joined in to make the six pack… On the black, there’s going to be a colour shift, and I put three layers of ink on each of the blocks to get enough pigment on to show up – all but the ‘Luminous Yellow’ have good coverage, and may well have a role to play on dark backgrounds. They clearly work well as regular highlighter pens.
Do they blend? I love to use Letraset ProMarkers as they blend so well together. The AquaMarkers also blend and merge nicely. So I put the new Neon markers to the test, and since they are water-based, I used them on a good quality watercolour paper:
Well, I’m not so impressed. Direct blending from the pen didn’t really happen – it rucked up the paper, and the colours tended to keep distinct from one another. Adding water caused the crossover to become blotchy and granulated. Washing out with a wet brush was slightly better, but the colours behaved differently, some moving readily, others less so.
I can’t see these markers making their way into my artwork – I don’t think they have the flexibility of use I enjoy from the ProMarkers or AquaMarkers, and I already have highlighter pens around the house that do the same job. I think Letraset have missed a trick here – the Neon Markers don’t seem to be either ProMarkers or AquaMarkers and that’s a pity.
Which watercolour effect?
I’ve been playing with various watercolour effects, out of curiosity more than any thing! Thought I’d share the results, just in case someone else might be interested… All of them feature a Stampendous stamp (Cling Poppy Scene #CRM234).


