3D Projects
Art on a moving canvas

VoldemortNow I’m not entirely sure why I appear to have googly eyes in this photo… but I was the nominated driver, so it wasn’t the butterbeer! This is me, as Voldemort, at a Harry Potter fancy dress party last night. I started the makeover by using a Pritt glue stick to stick down my eyebrows – several layers, drying between each. Next was eye liner and eye shadow – doesn’t that need practice?! Then copious amounts of white face paint, with added red round eyes, and hints of green. Finally veins and general grot were added with eye liner or black face paint and a fine brush before being smudged in. And then came the fun part of trying to not itch, brush, scratch, bump or otherwise remove any of it!

The nail are artificial and though supergluing them (that was the included glue) was good for security, not so good for quick removal later… Cover with a layer of white nail polish, follow up with dabs of grey in the bottom third, and then dab green on the cuticle line. Add dry brushed brown lines for texture, smudging with a finger tip as it dries. Finally, mix a little black nail polish in a clear top coat and brush over the lot. White/green face paint over fingers and wrists to blend in, and emphasise the length of fingers using black paint in the  the webs between the tendons towards the back of the hand and blend in.

Top tip – apply your black tooth wax BEFORE you lengthen your nails.

I’ve never done any sort of make up before, and the moving canvas created particular problems – like my eyebrow covers peeling off when I was laughing…

And a handy tip – much the same make up job seems perfect to be The Emperor from Star Wars or Uncle Fester from the Addams Family. That’s the next couple of fancy dress parties sorted. I just won’t use superglue next time.

About me
This is perfectly4med…

Welcome to my blog, in which I aim to keep you up-to-date with my new career in art and design and showcase my work. Let me know if you want to purchase any of the artwork on display, all offers seriously considered. Please leave comments – I’ll need to moderate your first comment on my blog, but any future comments you make should appear straight away.

A list of workshops held at my purpose-built studio is available here.
Connect to me at The Studio on Facebook by clicking here.


Card Craft
Rose Blossom Purse Card (for Creative Expressions)

Rose Blossom Purse CardWelcome to another year on my blog, and we kick off with a card featuring the latest Creative Expressions Singles stamp – Rose Blossom Purse. The Singles range are rubber stamps pre-mounted on cling foam and cut out ready for slapping onto acrylic plates for stamping. I’ve done a simple card, concentrating on using lots of different colouring techniques for my tutorial…

Continue reading

About me
Come & Craft/Stashbuster Clinic – extra daytime session added

Facebook-stash-event-bannerFor a trial period, I’m going to open up the studio for a daytime Come & Craft/Stashbuster Clinic session on Wednesday mornings between 10am and 12:30pm (£5 per session). The Tuesday evening sessions have proved popular, but some don’t like coming out during the dark hours or when buses are less frequent. If the morning session proves as popular, I’ll continue them 🙂

For the uninitiated, the sessions are informal, with refreshments and some materials included. You can either bring along your unfinished projects and complete them in the creative environment of the studio, or you might choose to bring along stash and kit that you don’t know what to do with to get ideas and inspiration. If there are techniques or materials that you’d like to learn more about, it’s also a time for experimentation and play.

Booking is essential to reserve a place, and can be done online via my Workshops tab above.


Card Craft
Time Flies – thirty cards and a gift box

CollectionI fell in love with the ‘Time Flies Collection’ from Craftwork Cards at a recent Woodware Retailers’ Day. I got hold of the 8×8″ paper pack and the elements pack and set to work to create as many individual cards as I could using the elements and as little additional kit as I could. Using mainly Pumice Stone Distress Ink and double sided tape or glue, I made 30 cards and decorated a left-over chocolate box to make a gift box. Additional materials include foam pads; Onyx, Majestic Purple and Pewter Liquid Pearls and a bit of ribbon. A really fun project for the bits in between all the Christmas festivities, and a super collection of papers and die cuts. Several of the cog background cards are suitable for the ever elusive ‘man card’ as well. Clickable gallery follows…

UPDATE 02-JAN-14: Anyone attending CHA 2014 may just see some of these 🙂

Continue reading

About me
I’m a published artist in a proper book!

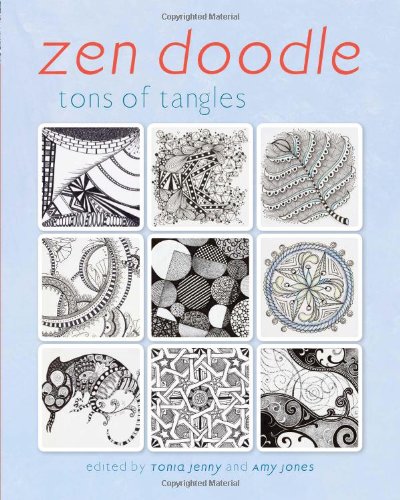
I’ve just found this book on Amazon – and my tangle features on the front cover!
Zen Doodle: Tons of TanglesMy ‘Arabian-Style Tangle’ is in the middle on the bottom row. It features on page 2 as well, and step-by-step instructions are on page 60. Best of all, I’m a contributing artist in the list on page 122. I’ve yet to get hold of a copy – I’m wondering if it’s the parcel that went missing back in October. I’m also hoping to be able to get hold of discounted copies, but in the meantime, follow the link through to Amazon and get it there… I’d be happy to sign any copies, should you desire me to deface the book 😉

UPDATE:
P&P means getting a stock from the US is unfeasible. For UK purchasers, please use the links above. For US purchasers, please use the publisher’s website: www.northlightshop.com. This will make signing for those that want it a lot more difficult 🙁

Card Craft
Painting with Glitter (for Creative Expressions)

Christmas DecsHappy Christmas! Hope you’re having a great day 🙂

For my final Creative Expressions DT post this month, I’ve used the fabulous ‘Rangoli’ singles stamp from their Henna range of mounted rubber stamps. The image is printed onto acetate using the Cosmic Shimmer Flake & Glitter glue before being ‘painted’ with the Cosmic Shimmer Polished Silk Glitters. Each image is mounted either side of a cardboard circle so that you can change your colour scheme each year to match that of the rest of your decorations. A quick make while everyone else is having a post-turkey snooze 😉

Continue reading

About me
More from my archive…

Train

My Mum turned up yesterday bearing gifts, and a lot of stuff she’s clearing out from the loft. One box contained collected items that are somewhat mice-nibbled, but are an archive of my childhood craft activities and school books. The above painting of ‘a train’ is perhaps one of my first forays into painting, aged 3½.


Collage CardThis is a Mother’s Day card – complete with insert reading ‘to mummy with love from Neil’. Not a bad first collage at the age of 5, March 1976.


SnowmanPerfectly apt for this time of year, this snowman was a wax on sugar paper masterpiece when I was living near Dubai in 1978, aged 7. About as far from snow as I could get at that point!


Guinea PigsWe’ve no idea whose guinea pigs these were as I think we were still living in Dubai at the time – I was 8. Notice the rosettes in the hair – I last had guinea pigs five years ago, and think I’d probably draw them similarly now 😉


Coconut IslandThis treasure island is undated, but probably from around the same time. It’s that time in drawing development when ‘sky’ meets ‘ground’ – although I wonder if it’s sea at the top with the sails of the ship appearing above the hill. May be a first foray into distance and perspective?

3D Projects
Stuffing Balls for Christmas

Ok, so the title of the post might be a bit misleading – I hate stuffing balls – unless they happen to be apple and sausage meat. But this post is about cramming polystyrene balls into 12cm high papier mache hanging decorations rather than anything edible. The inspiration for these came from Creativ Company, as did the shapes and balls.
Continue reading

3D Projects
Indian-style Home Decor (for Creative Expressions)

Henna Mosaic FramedThis home decor piece uses the Mosaic and Floral Corner Singles stamps from Creative Expressions ‘Henna’ stamp range. By using watercolour paper I hope to have given the impression of the texture of rich Indian fabric, and using offset printing as well as careful cutting given dimension and interest to the piece. A frame from Ikea sets off the project a treat and allows it to stand freely or be wall mounted.

Continue reading