Couture Creations Dreamboat Collection at Creative Expressions (Part 1)

Blog HopWelcome to the Creative Expressions Couture Creations Blog Hop! Hopefully you got here from Pam Smith’s blog, but if you didn’t, here’s the start at Creative Expressions News Blog!

The Couture Creations Dreamboat 3-in-1 sets include coordinating clear stamps, embossing folder and dies that work together in so many different combinations.

And one randomly selected person commenting on this project before the closing date will win a fabulous prize package:
– Zentangled Saying Pre Cut Stamp
– Glitter
– Cosmic Shimmer Dries Clear Glue
– Cosmic Shimmer Silver Shine Detail Embossing Powder

PLEASE NOTE:
THE PRIZE WINNER HAS BEEN SELECTED – further comments are welcome, but are no longer eligible for the blog hop prize package.

If you want to sign up to follow my blog, the widget is right at the bottom of the comments… and here is my project for the blog hop:

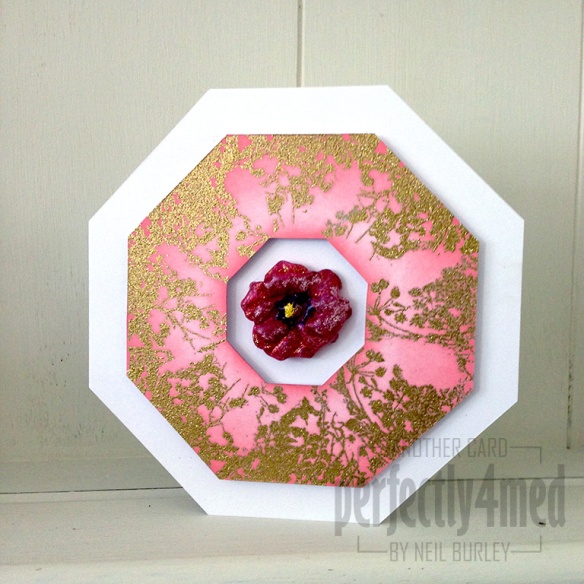
Doilies Card
You will need:
Couture Creations Dreamboat: Doilies 3-in-1 set
A4 sheet Foundations Milk cardstock
A4 sheet Foundations Dark Roast Coffee cardstock
Ranger Liquid Pearls: Dark Chocolate
Cosmic Shimmer Embossing Powder: Denim Lilac Aurora
Cosmic Shimmer Angel Fibres: Enchanted Metallics
Cosmic Shimmer Specialist Acrylic Glue
Clear embossing ink (e.g. Ranger Perfect Medium)
A dark brown Distress Ink (e.g. Walnut Stain) and applicator tool

  1. Use the largest die to cut out one shape from white card stock. Ink the lower of the two medium circles on the stamp with embossing ink and print onto the cut piece, lining up the stamp to the shape. Cover with embossing powder, tap off excess and heat set.
  2. Repeat using two die cuts of larger of the two daisy type dies and emboss using the petalled circle toward the top of the stamp.
  3. Repeat using two die cuts of the smaller daisy type die and emboss using the centre of the first circle you using in 1.
  4. Finally, die cut two pierced hexagons and emboss with the pattern in the centre of the other medium circle on the stamp set.
  5. Using the embossing folder, emboss pieces of Milk card stock – you need one of the largest circle (bottom left), and two of the medium circle above. Cut these out with a knife or scissors, leaving a small border.
  6. Edge the embossed sections with the brown Distress Ink to soften them, then the embossed pieces as shown using foam pads. Top off the layer with a punched flower centre and add Liquid Pearl dots as desired.
  7. Prepare the Angel Fibre background by laying some out on a clean sheet of paper and then laying another over the top prior to ironing over with a medium hot iron – you only need to do it briefly. If heated enough, a flat sheet results that doesn’t fray. If heated too much, it will shrivel and discolour. Attach to the Dark Roast Coffee card stock with double sided tape and trim to shape.
  8. Cut a strip of Milk card stock and edge with Distress Ink. Cut a narrower strip of Dark Roast Coffee card stock and notch either end – stick down to previous strip. Cut two further brown strips, slightly wider, bend to make a bow and stick down. Add embossed and mounted sentiment and finally the two hexagonal embossed shapes.
  9. Mount all the layers together and embellish as desired with Liquid Pearls.

Thank you for visiting my blog, please leave a comment below in order to be in with a chance of winning a prize!

Once you have done that, you will need to click here to visit Donna Ratcliffe’s blog. 

To help you along the way, here is a list of the Blog Hop:-

Start page, prize details and how to take part: Creative Expressions News Blog. The blog hop started on Tuesday 19th November at 10am and ends Friday 22nd November at 5pm.

  1. Kim Robertson
  2. Pam Smith
  3. Neil Burley (this page)
  4. Donna Ratcliffe
  5. Tracy Heaton
  6. Kerry Hickton
  7. Kim Dellow
  8. Trace Metcalfe
  9. Cathi O’Neill
  10. Tracy Evans

Thank you for taking part in our Blog Hop – good luck!

I’ll be posting five more Dreamboat Collection projects on Saturday, and my normal weekly post for Creative Expressions tomorrow (Wednesday). Keep coming back for creative inspiration 🙂

AS SEEN ON CREATE & CRAFT TV over weekend of 16th-18th November 2013.

The Creative Expression Experience

Creative Expressions


I spent the day yesterday in the company of most of the new Creative Expressions Design Team, and what a day it was 🙂

Aside from the personal introductions, I also had a sound introduction to the product line – and I have been sooooo missing out on some of these goodies. Of course the credit card is now getting battered as I build up my stock of Creative Expressions/Cosmic Shimmer goodies ready for creating my design team projects, but play time ahead! I hope to be adding a quick product review to each of my posts as well as I learn the dos and don’ts of each medium. Watch this space for CEDT projects each Wednesday: I’m busy working on a top secret project for them as well, ready for a future TV airing – fingers crossed 🙂


Autumn arrives…

Autumn arrives

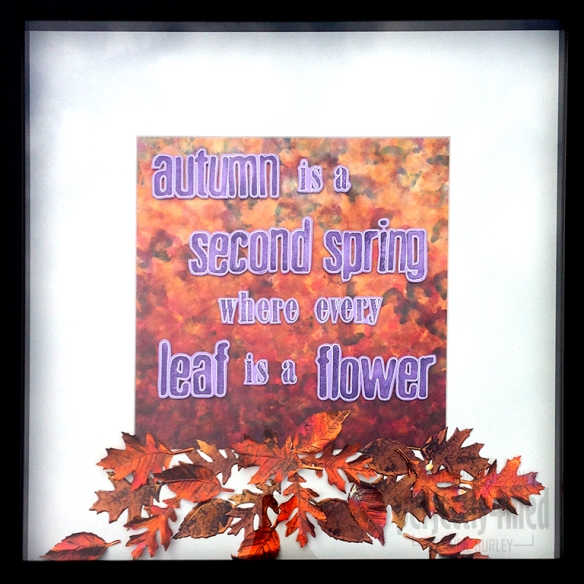
It’s officially autumn here in the UK, and on cue, the sun has disappeared, the temperature has plummeted and the rain is thrashing down! I’m having a go at getting on the Creative Expressions Design Team, and submitting a last minute entry to their design team call which closes today. As part of the application, I had to create a piece on the theme of ‘autumn’ and spent Wednesday making this piece. It’s in a 50cm square frame and features a 12×12″ alcohol inked glossy background, stamped and heat coloured embossed copper leaves and stamped and outlined lettering. For more making details, read on!

Continue reading

Two new workshops added

I’ve just updated my workshops page with two new sessions:

Make Your Own Embellishments – Saturday 5th October (£25)

A day of demonstrations and practical hands-on experience making your own embellishments for card making or scrapbooking: includes tips and tricks for colouring, moulding, shrink plastic, customised ‘metal’ tags, paper and fabric flowers, colour coordination and embellishing die cut lettering. If you have a layout in mind, bring your photos and make your own bespoke embellishments to match.


Painting with Powertex – Saturday 2nd November (£50)

African SceneIn this session we’ll be using Powertex (a specialist pigmented liquid fabric hardener) as a paint. You’ll explore building up layers and texture on canvas and on a frame, making a complementary air dry clay to create figures or shapes to embellish your piece, and learn techniques to colour your pieces further with powered pigments.


For more details, pictures and to book online, go to my
workshops page. Full terms and conditions are also available using the link at the bottom of the same page.

Mixed media cards

It’s demo time again for the Manic Stamper Craft Club, and I’ve spent the last four sessions teaching various techniques, including distress inks, image transfer, acrylic paints and myriad other art materials. There was a request that we take time out this month to put the techniques into practice, so I’ve spent a while in the studio coming up with these three cards:

The bath time one features image transfer, distress inks, and faux rusted enamel technique. The flowers use acrylic paints for background, stamping, tinting and covering metal embellishments. The final card uses the Ranger Summer Palette Challenge colours in distress inks, stains and alcohol inks as well as a bit of shine from Perfect Pearls, trying the capture the long car journeys for our summer holidays! Hopefully they’ll be enthusiastically received as examples of mixed media chemistry 🙂

Embellished embossing powder moulding

IMG_3652


It’s a ‘Nature’ theme over at WOW! Embossing Powder Challenge blog this month, and for my design team contribution, I’ve used their pansy mould to make and embellish the centrepiece – all made with embossing powders. For a mini-tutorial, follow this link


Quick mixed media tags

I’ve got into the studio at last to do my own thing in between some craft room reconfiguration and college work! I’ve chosen to do some quick mixed media tags using mainly Ranger/Tim Holtz products:

Continue reading

Twelve Tags of 2012 – December

It’s the last Craft Club of the year tomorrow, and thus the last of my twelve tags of 2012. This one incorporates WOW! Embossing Powder, die cut tattered pine cone, a cocktail stick, hot glue, dry glitter and the special secret ingredient – an upcycled orange juice carton! There will be the option to add holly sprigs as well.

[Not quite] Exclusive Stamp News!

I’m finally allowed to reveal one of the brand new line up of WOW! Embossing Powder stamps making their debut at the Hobbycrafts Exhibition at the NEC, Birmingham from 8th November 2012.

It’s called ‘NB Canvas’ – and it’s my design 🙂

This versatile frayed fabric stamp will be great for inked backgrounds, but obviously works far far better with a layer of embossing powder to give really tactile texture and a fabric feel to your projects. It’s roughly A6 size, so will work well on cards and scrapbooking as well as altered art projects and why not – even fabrics!

It’s not available in stores yet – as I said, it will debut at the NEC show – but snap one up as soon as you see it!

I’ve created a project with it over at the WOW! Embossing Powder Design Team blog, so please pop over and have a look!

Multi-Ink Tag – Twelve Tags for 2012 – October

I appear to have forgotten to post that I’ve created my tenth tag for my Twelve Tags of 2012 series, featuring the flower of the month, Calendula. Or at least my approximation of it! And I’ve learnt to use my new camera and MovieMaker to do a ‘how to’ video as well. Please let me know what you think!


[youtube=http://youtu.be/NyeP7octFCw]