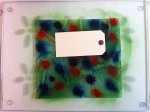
Jumping Beans – tangle pattern

Well dear reader, welcome to another week of daily tangle goodness 🙂

This first pattern is direct from a childhood memory of a small ball bearing in a capsule simulating a Mexican jumping bean. Just one rule with this – make sure the ‘ball’ is consistently placed by gravity, only horizontal capsules can have the ball placed anywhere. Fill in the gaps with movement lines.

Tomorrow’s pattern: ‘Ovate’.

Gingham Tablecloth Card

This week’s theme at my favourite ProMarker challenge site, Passion for ProMarkers, is ‘gingham’ [Week 108]. I decided to make my own gingham paper, and it sort of developed from there. It was particularly timely to have available the free gift stamps from Quick Cards this month, the ‘Time for Tea’ stamp collection by Beth Gunnell. I replicated their colour scheme as my head’s a bit fuzzy at the moment, but the card design is all mine.

UPDATE: I was in the top five for the challenge 🙂

Continue reading

A different take on jam labels?


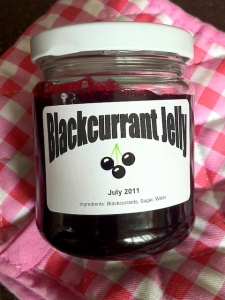
I harvested my crop of blackcurrants yesterday evening and was pleased to have got around 900g from my one bush down at the allotment. A bit of boiling, sieving, sugaring and wrinkle-testing later and I had seven jars of blackcurrant jelly setting nicely. Full of my own creative juices this morning, I came up with a novel idea for the labels: I wanted to use the very blackcurrant colour of the jam to depict the fruit on the label. So I printed the text onto my labels (Avery L7160) and used the long-arm Cropodile to punch out three holes per label. A few green lines as stalks and a dab of white Signo pen and ’tis done. It’s a bit hard to see the colour in the photo (and indeed on the jar!) because the jelly is so dark, but the side on view shows the reflections in the glass to  show the punch through more clearly. A quick idea to personalise your jam labels.

Tie A Yellow Ribbon

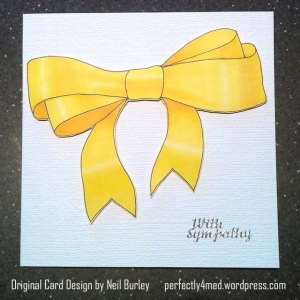
I’m cutting it fine with this week’s submission to Passion for Promarkers challenge [Week #107, ‘tie a yellow ribbon’]. From selecting colours, finding the cardstock,  drawing the bow freehand, shading and blending to cutting out, mounting, photographing, uploading and blogging in less than 45 minutes. And all because I don’t have any yellow ribbon in my stash! Managed to submit it with two minutes to go… and I’m not a morning person either!

Continue reading

Beaded Poppy

Following an enquiry from my sister, I tried making a beaded poppy. Still not sure exactly why she wants one, but I was sufficiently motivated to have a go.

I did this freestyle in brick stitch, making the first petal shape up as I went along. The other four were approximate matches to the first. The centre is meant to be a circular brick stitch, but didn’t quite work out that way, but does the job nicely. There’s something not quite right about it, and I suspect it’s the shape of the petals and the overall flower. A bit more work needed, but a good enough first go at brick stitch, and also a 3D beaded project. The whole thing is about 8cm diameter and each petal has a self-supporting gentle curve to it.

Unique Giveaway #1 – the prize pics

Dear readers – as promised, here are teaser pics of my subscriber draw prize book in recognition of 10,000 views of my blog 🙂

The cover is hand-tangled with my own designs [it’s taken ages!] and will be personalised with the initial letter of the winner’s choosing before being sealed with a gloss varnish finish. It’s a hand-crafted book [which took ages too!], with hard cover and sewn and glued spine.

Inside are colour copies of all my tangle patterns from January to June 2011, and the eight tags will contain hand-drawn tangles, with tips on shading and may be even a unique and unpublished, exclusive tangle pattern.

Remember, to be entered in the draw, subscribe to my blog using the ‘Sign me up!’ button in the side bar on my blog home page by midnight on 30th June 2011. Subscribing to comments or any other page will not enter you into the draw. The winner will be drawn at random from my subscriber list and I’ll contact you by email if you are that lucky person. Good luck 🙂

Unique Giveaway #1

Dear readers – in anticipation of my 10,000th view of this ‘ere blog, I’m in the middle of constructing a one-of-a-kind handcrafted book of my tangle patterns, complete with hand drawn tangles and tips. Pictures to follow, but I wanted to give you all the heads-up. This will be given away to one of my blog subscribers, drawn at random from my subscribers list as it stands at midnight on 30th June. So keep an eye out for the prize pics, and if you haven’t become an email subscriber, then click the ‘sign me up’ button at the top of the right hand sidebar. Good luck!

Juice Carton Card

20110618-024828.jpg

I’m teaching my card project today in Leicester – and I think this may be another innovation… For the squares on this card, I’ve cut up a juice carton (the foiled type Tetrabrik) into 3.5cm squares before embossing using a Big Shot and Fiskars texture plates and then colouring with alcohol inks and mounting onto black cardstock. I took off the ink with a cut’n’dry nib soaked in blending solution, and outlined the areas with a black permanent fine tip marker. The ‘leading’ is Pewter Liquid Pearls from Ranger. Recycling at its best!

Paper Towel Printing – Distress Inks

I’ve carried on playing with my newly discovered technique, and thought I ought to try Paper Towel Printing with distress inks. Here’s a step by step guide:

Firstly, place your sheet of paper towel onto a glass mat or other non-absorbent surface. Wet by spritzing with water.

-=-

 Then I spritzed with homemade glimmer mist spray – good to have a background colour. I think it also helps the other colours keep in their place… This one is Peeled Paint with gold perfect pearls.

[To make your own mist – take one dropper full of reinker and add it to a mini-mister. Add a small scoop of perfect pearls. Fill with water to three quarters full, replace cap and shake vigorously. Spritz.]

-=-

Drop on ink from your choice of distress ink reinker – this is Faded Jeans.

-=-

Spritz each of those dots with water until they start bleeding.

-=-

Repeat with more colours – this is Spiced Marmalade.I also added Dusty Concord.

Spritz with water.

-=-

Start printing! Lay a tag/paper/cardstock/ATC on the towel and smooth down with your fingers. You may see water squeeze out of the edges at first – that’s what you’re after 🙂 You’ll also find the colours start to spread a little more into one another.

-=-

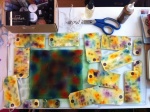
All of this from one sheet? Yup – and they are all double-sided as well. It seems that the colours stay pretty much where you put them, so this would be great to carry a colour theme throughout a tag book, or art journal, or across several pieces of cardstock for scrapbooking or card making.

-=-

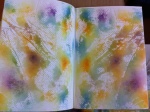
And there was still some left over to do my art journal 🙂

-=-

Close up of the tags – they’re a bit blotchy still as I didn’t wait to dry them before sharing this blog entry with you! Lots of texture on some, lovely watercolour effects. Love it!

Paper Daisies

Apparently hospitals don’t allow flowers to be brought in any more. Presumably greenfly are in danger of spreading MRSA around as they don’t sanitise between flowers? Any how – this lead to a request to make some paper flowers to take instead. And here they are. Using the large daisy punch, I sandwiched a whorl of florists wire between two cardstock daisies, stuck down with Glossy Accents. The centres were then layered with yellow six-petal flower punch, then a brown cardstock one inch sun punch before topping off with a disc of Liquid Pearls. Some petals were scored with small embossing tool, others were curved by pressing around a narrow cylinder. Rather pleased with the outcome, and so was my friend 🙂