[Not quite] Exclusive Stamp News!

I’m finally allowed to reveal one of the brand new line up of WOW! Embossing Powder stamps making their debut at the Hobbycrafts Exhibition at the NEC, Birmingham from 8th November 2012.

It’s called ‘NB Canvas’ – and it’s my design 🙂

This versatile frayed fabric stamp will be great for inked backgrounds, but obviously works far far better with a layer of embossing powder to give really tactile texture and a fabric feel to your projects. It’s roughly A6 size, so will work well on cards and scrapbooking as well as altered art projects and why not – even fabrics!

It’s not available in stores yet – as I said, it will debut at the NEC show – but snap one up as soon as you see it!

I’ve created a project with it over at the WOW! Embossing Powder Design Team blog, so please pop over and have a look!

College Term 4 – Jewellery – Week 6 – Part 2

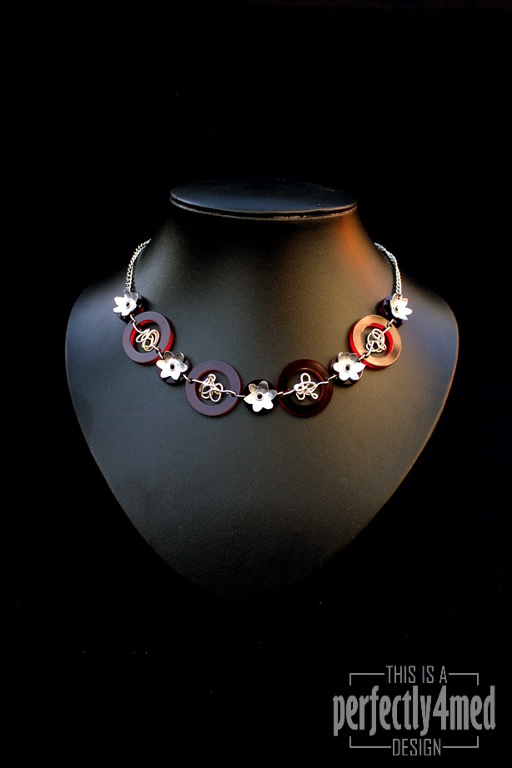
In a previous post you saw my aluminium and perspex necklace, bracelet and earring set. I also designed a second (bonus) piece using the offcuts from the perspex rings, and finished it today:

I’ve added silver wire tangles to the perspex rings. Each of the flowers were hand sawn from sheet aluminium and hammered into shape before being riveted onto the centre offcuts from the laser cut perspex rings. I’m planning to do two more flowers in the session tomorrow to complete a pair of matching earrings.

And I think I’m getting better at product photography! Rather pleased with the serendipitous lighting on this one – early morning in the conservatory with a bit of level tweaking in Photoshop. No artificial lights were used in the production of this image.

It’s half term…

Though it’s half term, all is not quiet in the perfectly4med studio (actually it’s still the conservatory). I am busy creating demos and producing tutorial videos for WOW! Embossing Powder, including one using one of their new stamps being launched at the Hobbycrafts exhibition at the NEC, Birmingham from 8th-11th November. The stamp happens to have been designed by me, and as soon as I’m allowed to share the details you can be sure I will!

I’ll be on the WOW! Embossing Powder stand (M12-M15) at the NEC on the Thursday, Saturday and Sunday, so if you’re there, please come and say hello! They have some fantastic new products, two demonstration tables and on-stand workshops repeated throughout the day – be sure to sign up early if you want to get a place.

And having mentioned a studio, I’ll be shortly sharing details of my ambitions to get my own studio – I’d love to hear your experiences and ideas as I start to prepare to have a dedicated working space.

College Term 4 – Jewellery – Week 6

We’ve spent the last five weeks learning about the various ways of soldering (butt and sweat), cold joining with rivets, surface design (heat colouring, mill impressions, hammering) and playing with a laser cutter (I want one!). This week over five hours of lesson time, it was our time to make our own design – this is what I came up with:

Each of the metal discs were cut by hand from aluminium sheet, hammered to give texture, and wire brushed to make matte. I designed the acrylic flowers and circles to scale in Adobe Illustrator and these were cut from 3mm acrylic sheet on the laser cutter. They are attached to the aluminium discs using 2mm chenier tube rivets – several had to be done again as I was a little heavy handed at the beginning and cracked the acrylic. Links are commercial jump rings, as is the chain – time pressures didn’t allow me to make my own. Not that I’d know where to start making chain! I’m really pleased with the result, and aside from the laser cutting, all the techniques are feasible in a home studio.

College Term 4 – Ceramics – Week 4

Yes, I know, there’s a week or so missing from the ceramics thread – I’m waiting on some of the things I’ve been making to get fired in the kiln so you can see the before and after. This week, amongst other things, we were invited to play and experiment with extruded clay. Here’s my (unfired) tile with my experimentations:

From top, all extruded shapes:
1) Twisted trefoil
2) Square, alternating full and half-slices
3) Square, pierced and cut
4) Trefoil, pinched and dented
5) Trefoil, sliced and indented
6) Trefoil, pinched and dented
7) Square, irregular slice, end on
8) D-profile, coiled
9) D-profile, plaited
10) D-profile, stamped with biro lid and nib
11) D-profile, pressed with curved edge of serrated kidney tool.

College Term 4 – Painting – Week 4

More painting mayhem this week – this time we had to work large… very large! This painting is A1 size, with the viewframe being 4.3x3cm. I completed this in about two and a half hours, in acrylics, mixing colours from primaries and white. The rose bead and the filigree bead need a little more work, but I didn’t think it was too bad overall.

College Term 4 – Painting – Weeks 2 & 3

Well, the Mac is currently reinstalling from back up – silly me decided to do that over the network, so there’s another day to go! Meanwhile, back in real time, I took more photos of the oil paintings from week 2 (the first three) and one from week 3. Each painting is 15cm square based on a 3cm square frame of my bead collection. We were working in brown monotone, making our browns using colour theory: blue and yellow to make green, green and red to make brown, add blue to darken, yellow to lighten and be careful with the white! A small amount of the light brown mixed with white made the background cream. I reckon I was getting much better by number 4… Let me know how you think I did!

College Term 4 – Ceramics – Weeks 1 & 2

So far this term in ceramics, we’ve been learning techniques – week 1 included shellac and masking tape resist, piercing and carving. The tiles were fired and then I was asked to embellish the pierced tile – I’ve used beads, head pins and a bit of superglue. The result has been variously described as St Basil’s Cathedral, Brighton Pavilion or the Taj Mahal! I’ve already thought of a way of adapting it to make a final major project, so keep watching the blog 😉

Carved pattern – Masking Tape Resist – Pierced – Shellac Resist

College Term 4 – Painting – Week 3

It’s monoprint week, using oils. This is a completely new technique for me: paint onto glass with oil paints, and then press a damp sheet of paper down onto it to make the print. Not sure that it will become a favourite technique – I prefer using a gelatin plate and waterbased colour, but I guess I’m still a beginner! As before, I’m working from my collection of beads, and each print is 15x15cm. First image in the pair is the oil painting on glass, second is the print.

I’m quite pleased with the improvement – partly from making sure the paint was a little thinner on the plate, and the paper slightly damper to make the print. I particularly like the iridescence I managed to get on the last purple bead – I included all the colours I’d used on the other beads.