Altered Art: That’s Crafty! Top Hat

I had meant to show this off on last week’s shows on Hochanda. We were all set for Charlie to demonstrate pulling a rabbit out of a hat, but we had left it under the counter and completely forgot about it in the heat of the moment.

To be more accurate, this is a slide pop-up. The rabbit is my own illustration, possibly coming to a polymer stamp set soon! The top hat is one of That’s Crafty! Surfaces – a MDF upright, designed for the top hat to be the other way up – but with a bit of crafty hiding and wedging, it works just as well upside down.

Continue reading

Altered Art: Candy Cane Tree Decoration

candycane

I’ve designed some hanging decorations for December’s workshop that slide onto a wooden split type peg. There are several designs, but this is one of the newer ones, and certainly the most complex to colour in… Using nothing more than five colours of ProMarker and a pencil, this candy cane tree decoration is ready to copy! There are spaces available, but please book in as soon as possible – I have a lot of cutting out to do…

I’ve also been playing with my Foldio360 bluetooth controlled turntable a little more. It’s recently had some new DSLR settings provided meaning that, finally, it remotely controls my proper camera for top notch pics, which I can then edit and stitch in Photoshop. Now to find a decent 360° viewer plug-in for WordPress so that I don’t have to save as a clunky animated GIF.

candycane

Continue reading

A Graffiti Journal

I’ve been fascinated with ‘proper’ graffiti since a child – I love the colour, the vibrancy, the illegality of the hobby and the absolute control of the medium and the application. I’ve also owned a ‘how-to’ book for a number of years, well-thumbed but never used. That all changed when I made a journal from corrugated cardboard and once I’d started tearing off the surface layer, the idea developed to make faux rusty corrugated iron complete with requisite graffiti. I’ve tried different styles and colouring methods, starting with Sharpie pens, trying an image transfer, then Pitt Artist Pens. Then I had a sudden thought of how to replicate the aerosol can at this small scale – I got out my LetraJet air brush attachment for my Promarkers and thus smooth blends appeared. Lots of Posca pen use as well to finish things off.

IMG_7112

Continue reading

Art Journal Page: The Course of Civilisation

IMG_7057

More art journaling! This layout started out with a pale watercolour effect, which I suspect (though don’t remember) is actually bleed through from spray inks I’d used on either side. I decided to keep it as it was, so to stabilise it, I did a quick layer of DecoArt Media Matte Medium to seal it. Over the top went some napkin decoupage to maintain the water colour effect, added and sealed with the same matte medium. A bit of Distress Ink around the sides to tone down the edges, and then I drew the text on with ProMarkers. This seemed a good idea at the time, as I could colour match the ink to the roses – but of course acrylic based paints/mediums break down with alcohol. I solved the nib clogging issue as a result of this by running it out on scrap paper between words, and going over each letter twice to get the colour. Next time I’m going to try out my Pitt pens instead. I sealed everything with some DecoArt Media Ultra Matte Varnish, being careful to not over-brush where the distress ink was added.

I’d like to have planned the text justification a little more –  but then that’s what art journals are for: to experiment in, and learn from the experimentation.


Continue reading

Background Check: Day 4

BC_participantYesterday’s class was all about die cutting and how to use them in backgrounds. Now I’m not that much of a fan of die cuts, especially the confetti that covers everything with the really intricate ones. I decided to use a different approach, and cut out my cards using my Silhouette Cameo and designed my own shapes inspired by the dies used in the class.

The first is coloured with ProMarkers, and the second shaded with Picked Raspberry Distress Ink. The third is just the white cut out on a cream card – I think it’s a rather classy clean and simple design.

Continue reading

Art Journal Page: Simply Marvellous

IMG_6264_wAnother journal page using my new wooden block stamps – they work so well with the Dylusions paint. It’s just the right consistency to cover the stamp, stick to the page, and not squidge everywhere. Unfortunately it wasn’t quite the same when I used rubber stamps, which squeezed the paint away giving me the tramline outline that I then had to fill in with a paintbrush.

Continue reading

Love is… tarmacing

Love WordIt’s a lurve theme over at The Crafting Cafe this month, and the DT got to work with digistamps from the fabulous Bugaboo Stamps. Ava and Deacon’s Love Word was perfect inspiration for this 12×12″ canvas board layout. I coloured the image with ProMarkers and the board with acrylic paints and added my new favourite tarmac technique. For a bit more detail, see my post at The Crafting Cafe.


So grateful summer’s here…

Though everything was a month late at the allotment this year, I did actually have blossom on the fruit trees, unlike last year, and some fruit has set. Unfortunately, the cherry tree is still having problems and I have just one cherry ripening. Not so on this card for The Crafting Cafe, featuring LEJ Designs ‘Blossom’ digistamp:


For more details on how I made the card, check out my post over at The Crafting Cafe.

Playing with ProMarkers

It’s been quite a while since I had chance to enter any web challenges, and since planning workshops is going fairly well, I decided to use time today to put that right. I’ve got out my ProMarkers again, and created two cards:
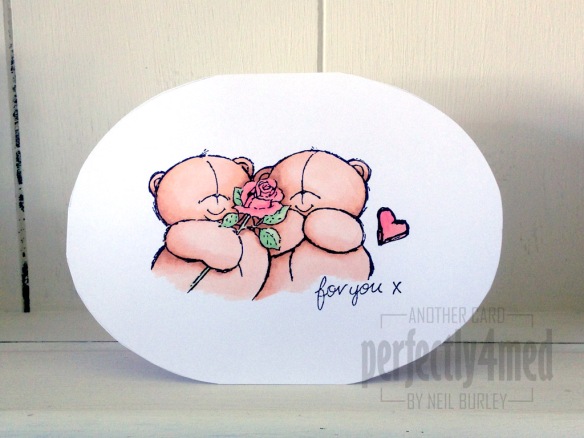
For you...The first is for the ‘Less is More’ one layer challenge this week, which requires that I use a ‘not square or rectangular’ card. I used string theory to draw out an ellipse template and transferred this to a card made from my favourite white coated cardstock (from Rymans) before stamping the image [docrafts] using Memento Tuxedo Black. I coloured the bears with Blush, Saffron, Ginger and Cinnamon, with Meadow Green/Apple and Pastel Pink/Salmon Pink for the roses.

Picnic timeThe second is for the ‘Passion for ProMarkers’ weekly challenge, which this time set the task of ‘set the scene’. I stamped the background image [Hobby Art – Countryside Scene] in Archival Jet Black onto watercolour paper before using AquaMarkers in Frost Blue/Perwinkle, Celery/Spring Green/Fern Green and Viridian with Granite and a waterbrush pen to colour. The picnic blanket was drawn freehand and coloured with ProMarkers – Warm Greys 1-4 over Lipstick Red. The girl is a stamp from Bild Malarna ‘Mimosa – Wonderful Day’ and complements the scene beautifully – she is stamped with Memento Tuxedo Black and coloured with ProMarkers: Pastel Yellow/ Sunflower/Gold and Caramel and Lavender/Orchid/Amethyst and skin tones blending Blush/Oatmeal and Apricot.