Background Check: Day 4

BC_participantYesterday’s class was all about die cutting and how to use them in backgrounds. Now I’m not that much of a fan of die cuts, especially the confetti that covers everything with the really intricate ones. I decided to use a different approach, and cut out my cards using my Silhouette Cameo and designed my own shapes inspired by the dies used in the class.

The first is coloured with ProMarkers, and the second shaded with Picked Raspberry Distress Ink. The third is just the white cut out on a cream card – I think it’s a rather classy clean and simple design.

Continue reading

Background Check: Day 3

BC_participantDay 3 of my online card class, and they’ve introduced a fab idea – a ‘design break’. A chance to use what we’ve learnt in class to make cards. I didn’t have chance yesterday as I was prepping for a large workshop (news of this released next week…), so I’ve been making the cards this morning before today’s class is released. Here are my makes:

The text is all self-designed and cut from 300gsm card on my Silhouette Cameo. Colour added with distress inks, direct to paper. I love the results of some of these – not styles I would have immediately gone for, but very effective cards. Now to go and see what Day 4 has in store!

Continue reading

Background Check: Day 2

BC_participantIt’s Day 2 of my online class, and we’re playing with stamps and inks to make backgrounds. In the main today was revising techniques I’ve previously come across, but always good to see them used in imaginative ways by the tutors and yank them back to the forefront of my memory! Here’s today’s highlights:

Lots of stripes, and not a stripe stamp in sight. What’s a man to do? Go find some funky foam and cut that into strips. Add a bit of removable double sided tape, and ta da, strippy stripy stamps and backgrounds 🙂

I also like the idea of working more on mid-tone cardstock. I remember in college working on a charcoal ground and getting on better – you can use light and dark shades to emphasise shape, form and, in this case, pattern. I’ve been doing some zentangling on Strathmore Toned Gray Artist’s Tiles and finding the same (more of that in another post).

Continue reading

Background Check: Day 1

BC_participantI’m taking part in Online Card Classes’ Background Check, and it’s Day 1, and time to get inky! Some of the techniques aren’t new to me, but a couple are, and a great addition to my mixed media arsenal. Here are the highlights of this afternoon’s play:

I have to admit the cloud on the sunset was a happy accident – my not so low-tack tape happened to tear off my carefully blended area, so a little more ink and a cloud was born! The metallic like sheen on the purple image is also accidental – the Hero Art Ombré pads do seem to have an unpredictable effect when used direct to paper.

Continue reading

Stencilled – Day Two

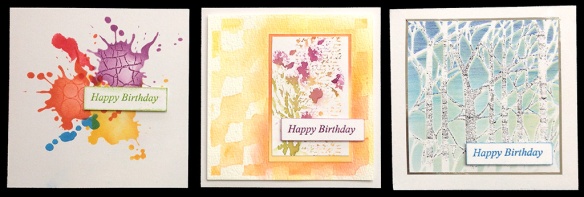
Stencilled - Day TwoDay Two of my online class ‘Stenciled’ – guess it’s American… Three more techniques suitable for all stencils. Todays are Tim Holtz’s Splatter, That Special Touch Distressed Checkers and Dreamweaver Trees Silhouette. And todays techniques included stamping, watercolour and coloured pencils.

And todays most important learning point – always mask areas outside the stencil as it’s amazing how far the back edge of a distress ink applicator tool can actually reach…


Stencilled – Day One

I’m doing another Online Card Class – this time reviewing the different ways of using stencils. None of it is rocket science for me so far, but it’s always good to see what others are doing and to share creative tips, tricks and which mediums work with which.STENCILED LOGO IMG_4258_wThese four cards are my take on Day One tutorials – using a stencil as a patterned background, spritzing though, using for emboss resist techniques and layering with colour. I think all the stencils above are from The Crafters Workshop and are the 6×6″ variety. The cards are 12x12cm. The black text has been cut out as a bespoke design on the Silhouette Cameo.