When you can’t get leather… try grungepaper!

Hi – this morning has been spent on a commission. I have been asked to wear something I have made using WOW! Embossing Powder when I’m demonstrating at the NEC next week [Hobbycrafts Exhibition, stand M12-15]. Though I didn’t immediately dismiss necklace or earrings, I didn’t think I’d enjoy the ear lobe crushing of a clip on, and necklaces just dangle in the melt pot… So I came up with two ‘man bracelets’:

Both bracelets are made from grungepaper coloured with Vintage Photo and Walnut Stain distress inks, embossed using Tim Holtz texture fades embossing folders, stuck down with Studio matte multi medium. Sewing reinforces the whole thing and the fastening is a Tim Holtz copper hitch. Bracelet 1 features the new WOW! Special Edition Embossing Glitters (Caribbean Jewels) due to be launched at the NEC. Bracelet 2 (The Other Wrist) features the WOW! metallic embossing powders. Grungeboard would work as well, but I didn’t have a size that wrapped round my wrist!

[Not quite] Exclusive Stamp News!

I’m finally allowed to reveal one of the brand new line up of WOW! Embossing Powder stamps making their debut at the Hobbycrafts Exhibition at the NEC, Birmingham from 8th November 2012.

It’s called ‘NB Canvas’ – and it’s my design 🙂

This versatile frayed fabric stamp will be great for inked backgrounds, but obviously works far far better with a layer of embossing powder to give really tactile texture and a fabric feel to your projects. It’s roughly A6 size, so will work well on cards and scrapbooking as well as altered art projects and why not – even fabrics!

It’s not available in stores yet – as I said, it will debut at the NEC show – but snap one up as soon as you see it!

I’ve created a project with it over at the WOW! Embossing Powder Design Team blog, so please pop over and have a look!

College Term 4 – Jewellery – Week 6 – Part 2

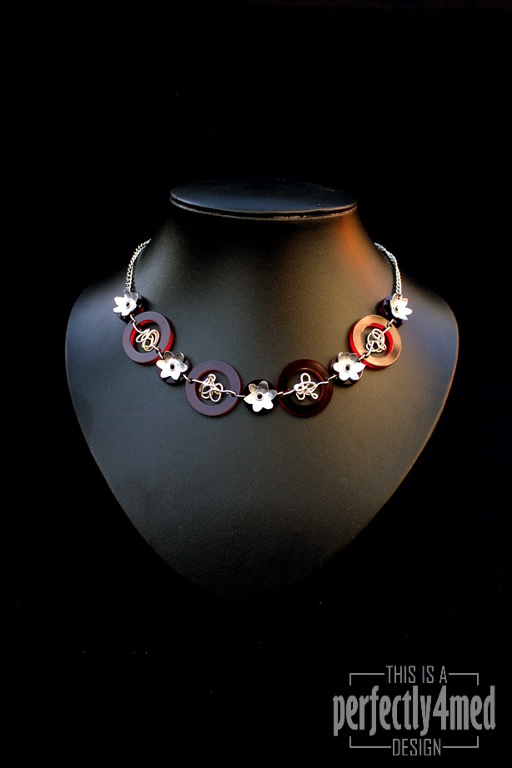
In a previous post you saw my aluminium and perspex necklace, bracelet and earring set. I also designed a second (bonus) piece using the offcuts from the perspex rings, and finished it today:

I’ve added silver wire tangles to the perspex rings. Each of the flowers were hand sawn from sheet aluminium and hammered into shape before being riveted onto the centre offcuts from the laser cut perspex rings. I’m planning to do two more flowers in the session tomorrow to complete a pair of matching earrings.

And I think I’m getting better at product photography! Rather pleased with the serendipitous lighting on this one – early morning in the conservatory with a bit of level tweaking in Photoshop. No artificial lights were used in the production of this image.

College Term 4 – Jewellery – Week 6

We’ve spent the last five weeks learning about the various ways of soldering (butt and sweat), cold joining with rivets, surface design (heat colouring, mill impressions, hammering) and playing with a laser cutter (I want one!). This week over five hours of lesson time, it was our time to make our own design – this is what I came up with:

Each of the metal discs were cut by hand from aluminium sheet, hammered to give texture, and wire brushed to make matte. I designed the acrylic flowers and circles to scale in Adobe Illustrator and these were cut from 3mm acrylic sheet on the laser cutter. They are attached to the aluminium discs using 2mm chenier tube rivets – several had to be done again as I was a little heavy handed at the beginning and cracked the acrylic. Links are commercial jump rings, as is the chain – time pressures didn’t allow me to make my own. Not that I’d know where to start making chain! I’m really pleased with the result, and aside from the laser cutting, all the techniques are feasible in a home studio.

College Term 4 – Ceramics – Weeks 1 & 2

So far this term in ceramics, we’ve been learning techniques – week 1 included shellac and masking tape resist, piercing and carving. The tiles were fired and then I was asked to embellish the pierced tile – I’ve used beads, head pins and a bit of superglue. The result has been variously described as St Basil’s Cathedral, Brighton Pavilion or the Taj Mahal! I’ve already thought of a way of adapting it to make a final major project, so keep watching the blog 😉

Carved pattern – Masking Tape Resist – Pierced – Shellac Resist

Multi-Ink Tag – Twelve Tags for 2012 – October

I appear to have forgotten to post that I’ve created my tenth tag for my Twelve Tags of 2012 series, featuring the flower of the month, Calendula. Or at least my approximation of it! And I’ve learnt to use my new camera and MovieMaker to do a ‘how to’ video as well. Please let me know what you think!


[youtube=http://youtu.be/NyeP7octFCw]

Pumpkin Surprise – tangle pattern

I don’t normally go for anything Hallowe’en. I do however like some of the crafty aspects of the time of year, particularly the pumpkin carving. I’m not entirely sure why, but I woke up this morning working out whether you could make a Hallowe’en tangle pattern. A quick sketch later solidified the initial idea, and following a few trial runs after breakfast came this:

Halloween tessellation

This is a tessellation tangle, or a tangle that tessellates! You’ll need to draw it several times to get the hang of it (or at least I did). Points to note: bats alternate with ghosts – bats have curved bottoms, ghosts have pointy bottoms (step 2). Bats wings are crinkled top and bottom (step 3), ghost ‘wings’ are smooth tops and crinkly bottoms (step 4). Oh and colour really makes this one come to life 🙂

Continue reading

Twelve Tags of 2012 – September

I’ve been playing with various options of putting colour onto metal – here are the results! I’ll be showing how to do them at the Manic Stamper Craft Club on Saturday.

The tags are first covered with metal foil tape (really thin foil – serves me right for going to the local poundstore!) and then I used a small embossing ball tool to emboss the outlines. Rub over the whole tag with black acrylic paint, and then wait for it to almost dry before rubbing off the paint from the tag – it should catch in the outlines. Add colour with acrylic inks (I used a paintbrush), Promarkers or alcohol inks (I used the Adirondack alcohol ink pen filled with blending solution to pick up dried alcohol inks from a palette). I love the aged look to the metal caused by the black acrylic, and the translucent colour from the Promarkers/alcohol inks. The acrylic inks are more luminous due to their opacity. By the way, alcohol seems to denature acrylic, so if your black coating doesn’t work out, wipe over with alcohol hand gel and try again!

And as a bonus, I’m publishing the forget-me-not doodle as a tangle pattern 🙂