If you’d like to turn these…
into this…

follow this link to the Craftwork Cards blog… and a chance to win it too!

If you’d like to turn these…
into this…
follow this link to the Craftwork Cards blog… and a chance to win it too!
 I was wondering how to use the fabulous beach/summer themed stamps from Creative Expressions for this week’s DT card as the sky clouded over and the temperature dropped. Though it’s allegedly summer (according to the meteorologists), this card captures memories of beach-side sun far better than the grey clouds outside! Framed by a Polaroid instant photo size frame, the individual images are layered to give depth and allow easier stamping and colouring. A perfect snapshot of summer.
 Welcome to the Creative Expressions June 2014 Blog Hop! Hopefully you got here from Donna’s blog, but if you didn’t, here’s the start at the Creative Expressions News Blog!
The four new large Frame stamps from Creative Expressions have been designed with co-ordinating mini frames inside, which can be used separately or as a whole and also swapped with other frame designs in the range. There are also an additional four mini frame designs, plus sentiment sets which have been designed to fit inside the various frames.
One randomly selected person commenting on this blog post before the closing date will win a fabulous prize of some of the new stamp designs.
—
Here are my blog hop makes (as seen on TV, well, two of them!):


For the boxes, I created a cut file to cut the box from an A3 sheet of 300gsm card using my Silhouette Cameo so that the sides were sized to fit the large frame stamps. It has a crash lock base, so will fold flat for posting. For the coloured decoration, I embossed with Cosmic Shimmer Bright Gold Metallic before colouring with the CS Pastel Iridescent paints. Cut out the centre of the frame, and replace with heat proof acetate stamped with the centre square and embossed with the same powder. The purple box is embossed with CS Tropic Violet Lustre for the large frame and CS True White Detail for the centre and sentiment onto Foundations A4 Card – Amethyst. For the wedding box, I created the niches by cutting a square out of the centre of each side leaving a 5mm border that I could fold inwards to stick the centre square onto (also with a 5mm border folded upwards). It’s all embossed with CS Arctic Pearl Lustre. The classic blue on white is CS Denim Lilac Aurora, which matches the CS Purple Violet Pearlescent PVA wonderfully for the raised dots. Reprint and emboss the centre and rotate to create the raised diamond sentiments, mounting with foam pads. Finally, I made the card by mounting the frame (CS Arctic Pearl Aurora again) onto a card with the centre cut out, using foam pads. I embossed the sentiment with CS True Black Detail and mounted that in the centre with foam pads again, leaving a gap. The lilies were left from a previous card.


—
Thank you for visiting my blog, please leave a comment below in order to be in with a chance of winning a prize! Here’s the allocated prize for my stop-off on the blog hop:
If you’d like to receive notification of new posts on my blog, don’t forget to sign up using the box at the top of the side bar to the right of your screen.
Once you have done that, you will need to click here to visit Tracy’s blog.
To help you along the way, here is a list for the Blog Hop:-
1. Julia Watts
5. Neil Burley – you are here
6. Tracy Heaton
8. Pam Smith
Start page, prize details and how to take part: Creative Expressions News Blog. The blog hop started on Thursday 12th June at 10am and ends Tuesday 17th June at 5pm.
Thank you for taking part in our Blog Hop – good luck!


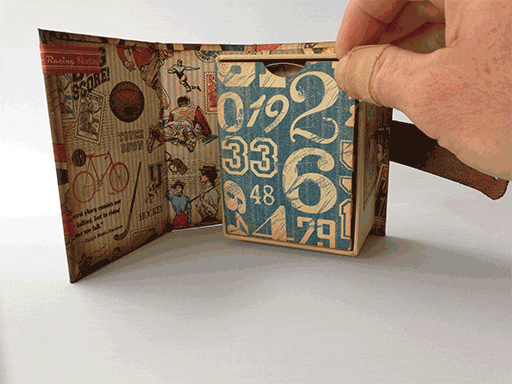
I must apologise for the lull in creating with the Graphic 45 Good Ol’ Sport papers for Jones Crafts. As you might be able to fathom from the images above, I had a bit of design hiccup – it’s all very well coming up with ideas, but then working out how to make them work can take a little longer!
I started by covering the Graphic 45 ATC Book with the papers, before making the fold out grandstand, edging with Vintage Photo Distress Ink. Next came the bunting, die cut pieces glued to some butcher’s twine and glued in at the edges so that it can swing backwards into the box when the drop down section is closed up. I then created the grandstand, using kraft card to which I affixed the front paper ribbon and more of the chipboard die cuts on the front tier. The rest of the cut outs are tabbed at the back with hinges allowing the items to fold forward as the whole section folds back up. A few pieces of cotton thread acts as the support and pulls everything into place as the grandstand is lowered.
Finally I used an Idea-ology fastener with grungepaper strip to make the closure, sewing it onto the back cover by drilling holes through the strap and the back cover. And just to prove it all works:
Earlier this month, I was busy creating with the cracking new paper kits from Craftwork Cards: Paper Couture, Al Fresco and Harbour Boulevard. Most of the samples I made featured in the inspirational studio display for the One Day Wonder on Create & Craft TV along with the other DT creations – and one is included in the Paper Couture inspiration instruction sheets exclusive to C&C. More making details are over on the Craftwork Cards blog if you’d like them, but here’s a gallery of the pieces I made:


I have some templates available to make the dress form, which were prepared for the CWC workshop in April that had to be withdrawn. Click on the ‘Templates’ tab above to go to an order page. I also hope to film an online class as my first for my new improved blog, so keep watching this space!


Every now and then I’m asked to work on specific projects under a publication embargo – so the blog goes quiet as I’m furiously working but can’t show you anything 🙁
Today’s post is an example of such projects – they feature the Cordoba die cut set from Creative Expressions, designed by Sue Wilson. Sue herself has approved their publication, which is around a month after I made them, so apologies if I don’t quite remember all the steps!

Creative Expressions have produced a fantastic range of dies and stamps by Sue Wilson – I’ve been given the Spanish inspired design ‘Cordoba’ to play with. This card is the first I produced with the three piece die set.
You will need:
Creative Expressions Cordoba Die Set
Creative Expressions Singles Set of 2 stamps: Perfect Poppy
Creative Expressions Self Adhesive Pearls: Cream (3mm & 5mm)
Cosmic Shimmer Specialist Acrylic Glue
Foundations A4 card: Rich Plum / Milk
Ranger Perfect Medium Pad: Clear
Ranger Distress Ink Pad: Seedless Preserves
– – – = – – –

This frame is inspired by the colours in the Cordoba Mosque, rich blues and golds. The image in the background is a doorway in that very mosque. The frame itself is built up with 5mm foamboard, with the die cut pieces layered over, and thin strips of card pushed round to cover over the thickness of the board. Finally I shaped real brass sheet round the whole thing to create the outer frame.
You will need:
Creative Expressions Cordoba die set
Creative Expressions Woven Leaves Pre Cut Stamp
Cosmic Shimmer Embossing Powder: Bright Gold Metallic
Foundations A4 Card: Cobalt
Ranger Perfect Medium Ink Pad: Clear
Walnut Hollow Metal Roll: Brass


Here are four gift boxes, with self-designed construction, featuring the new, and fabulous, Country Garden papers from Craftwork Cards. They are embellished with Card Candi from the same range, as well as paper bows from the offcuts. A smidge of Liquid Pearls here and there, and hey presto, a lovely project. And they got even more air time during the Craftwork Cards Birthday Bonus on Create & Craft on 15th/16th April – thank you Julie!


Full instructions and links to the templates are available at the Craftwork Cards Blog, here.

Unfortunately, not enough people booked for the workshop to be held at Craftwork Cards HQ near Leeds on Saturday 26th April, and it has now been withdrawn.
As I’d got everything ready, I have sets of templates ready to go, so I have decided to run the workshop at my home studio in Leicester. Please book with me directly by following this link to my workshops page and scroll down to the April section.


Being on a design team is all about working to deadlines. Julie Hickey does such a stunning job when presenting on Ideal World/Create & Craft TV, you really don’t get even the slightest hint of the frenetic activity behind the scenes. Now I have no idea what was happening at Craftwork Cards HQ, but I do know that the samples that I had to make up didn’t arrive as planned and had to be emailed to me at about 10:30 and I had these three samples into the post by 4:15pm for special delivery the next day for the show that evening. How’s that for pressured deadlines – and I wasn’t the only one… being on a DT isn’t all fun 😉
All three projects feature the brand new Country Garden papers. The first is a small pop-up box card with punched roses. The second is an adapted large pop-up box, with freehand cut vase filled with roses. I cut one of the sheets to resemble a table cloth, cutting the corners off the flaps and adding two pop-up triangles to create the ‘table’ surface as the card opens up. The vase and flowers are mounted on springs:
 This way, the card still fits in the envelope, but depth still appears as the card opens. The card is braced by a tabbed insert that keeps it open and the table top taut. The final one is a self-closing collapsable box which I have created and decorated up. All of the papers are edged with Victorian Velvet Distress Ink for a bit of definition.


The samples all featured on the Craftwork Cards Pick of The Day shows on Tues 1st – Wed 2nd April, although if you blinked you’ll have missed them as the paper packs and card packs sold out and the samples weren’t featured in later shows. Good for CWCs, but not so much for me 😉

I’m a bit behind on my posts this week… This is a pair of topiary trees that I made especially for the Craftwork Cards Candi Week, and they’re a giveaway prize over at their blog (still chance to enter if you’re really quick!). To see more on how I made them, go to this post. The planters are made from sheet greyboard, covered with titan buff acrylic and weathered with dry brushed Vintage Photo Distress Paint and Distress Ink. The balls are 8mm beads skewered onto cocktail sticks. The trunks of the trees are wound paper, and I rumpled tissue paper round it to add a bark effect.