
Until I’ve got round to setting up a Kickstarter project and found funding for my own laser cutter, I’m having to outsource my laser cutting. For my first laser cut project since college, I thought I’d mass produce some ‘planters’, suitable for the topiary trees I make with polystyrene balls and Craftwork Cards Candi (examples here and here).

The planters are roughly 2 inches square and 2½” high and cut from white faced 2mm thick greyboard. I’ve made sure that they are simple to construct and stiff enough to hold up the tree (or whatever else you choose to put in them). I’m pleased to announce that the kits are now available to purchase for £3.25 (including p&p and an instruction sheet). All you need to add is decoration and a cube of polystyrene to poke your tree into.

Here’s a quick guide to construction:
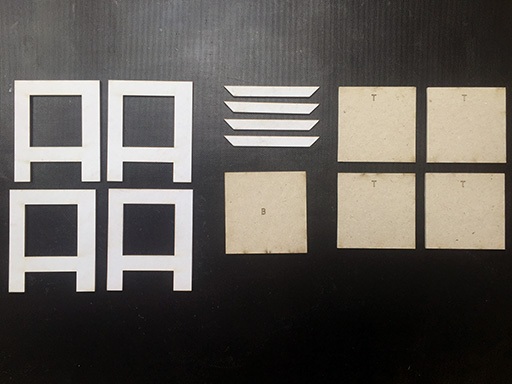
 The kit laid out, showing all the pieces. Note the side and base squares are shown with white face down and label side up.
 Firstly, glue the sides together as shown. Note the ‘T’ denoting the top, and that white sides are face down. Line up the top and right edges.
 Next, stick the sides together. Glue as shown, making sure the edges are squared up and the single thickness at the foot is firmly glued down.
 With all four sides glued together, place the planter top side down, and glue the base (marked ‘B’) in place – this ensures the planter is square and the top flat.
 Finally, turn the planter upright and glue the four mitred top planks in place. They overlap the outside edge, and the inside edge goes along the glue line between the two side panels.

Optional detailing:
By cutting ‘v’ shaped grooves as shown, you can simulate a wooden board construction on your planter.
The planter is ready to be painted/decorated once the glue is set. I use a 2″ cube of polystyrene stuck in the planter to push the trunk of the tree into, covered with a mulch of seed beads. For the spherical finials on the corners in my examples, I used 8mm diameter beads mounted on cocktail sticks pushed into the corners (not included in the kit).
NOTE:
If you intend to use papers to decorate the inset side panels, proceed as follows:
– cover the white side of the side panels with your papers, noting which edge is the top
– paint the ‘A’ frames before continuing the instructions as above.