Beauty in Simplicity: art journal page

IMG_5878_wNow that I’ve finished my latest quilt, it’s back to sample making showing off the Carabelle Studio stamps I will be playing with demonstrating at Daisy’s Jewels and Crafts on Saturday 11th April (10am – 4pm). Featured today are ‘Envolée de Papillons’, ‘Background Papillons’, ‘Papillion Grunge’, Collage Texte et Négatif’ and the XXL size ‘Négatif et Papillons’.

The page features lots and lots of layers of distress inks, acrylics, scraped gesso, and Wendy Vecchi Archival Inks, as well as Tim Holtz life quotes and tissue tape.


Art Journal Pages: with Carabelle Studio Stamps

Here are some more previews of projects I will be demonstrating at Daisy’s Jewels and Crafts in April. I’ve created a couple of art journal pages using Carabelle Studio‘s ‘Steampunk Man Portrait’ ‘Steampunk: Machine à remoter le temps’ with ‘Collage Texte et Négatif’. The second page features ‘The here and now’. And the third features Birgit Koopsen’s ‘Leafs’.

IMG_5856_wIMG_5859_w


IMG_5858_w


Art Journaling – Inverse Silhouettes (2)

We had fun last night with inverse silhouettes at my Art Journaling Session here at The Studio. There was a little bit of apprehension at painting over a perfectly good background, and then ooohs and ahhhs as the colours started to zing against the black. Here’s another  of my examples from last night:


ArtDaisies_w


I think the background is Distress Paint using the spritz and splat method on a non-stick craft sheet. The white is brushed acrylic ink, with Signo broad white pigment pen over the top, and the yellow centres and daisy shadows are Sharpies. I’ve also added a bit of shading at the top of the circles to suggest a drop shadow under the black layer with a water-soluble black pencil smudged out with a water brush.

I was also reminded of several other pieces I did back in 2013 using a similar technique – the post is here.

Continue reading

A Tale of Two Crackles – Part Two (for Creative Expressions)

Crackle BouquetAs I mentioned last week, I’ve been playing with some crackle effect mediums over the past months. Last week I showed you the two-step Craquelure, new from Cosmic Shimmer. This week: Cosmic Shimmer Crackle Glaze. This is a single step crackle medium which you paint over the base colour which forms the crack colour. The top coat is then painted over the top when dry in the opposite direction, and in the colour that will be cracking. Here’s the result when Antique Linen Distress Paint is cracked over Cosmic Shimmer Mulled Wine Matt Chalk Paint.

Continue reading

A Tale of Two Crackles – Part One (for Creative Expressions)

Craquelure Heart

As followers of my blog will know, I’ve been playing with some crackle effect mediums over the past months. Well, Cosmic Shimmer have brought out their own to compliment their new paint range, and I’ve finally got hold of some to try. Alongside, I’ve also played with their new Chalk Paint, and some new MDF shapes and floral stamps I’ve been sent to play with this month for my Design Team projects.

This week: Cosmic Shimmer Craquelure. This is a two step crackle medium, both layers go on slightly milky and dry clear. The base coat goes over the colour you wish to be cracked (in this case Antique Linen Distress Paint). The top coat forms a clear crackle, and can then be rubbed over with the crack colour (in this case Mulled Wine Matt Chalk Paint and Vintage Plum Gilding Wax. Where I didn’t get the top coat thick enough, the wax caught more (see top right), but the rest was a really lovely, random crackle. Loved it!

Continue reading

Upcycled Mini-Egg Tube Storage Solution

The master of crafty invention, Tim Holtz (along with his friends at Ranger Ink), has come up with a brand new mini-applicator tool for the ever popular Distress Inks – if you’ve not come across it yet, it’s circular and smaller than his previous rectangular ones. I’m still waiting on my order for the tool, but I had a delivery of the replacement foams…

I came up with a storage dispenser for the foams, but the design was a little flimsy and I wasn’t entirely happy with it. As I was munching through some Cadbury’s mini-eggs (don’t you just love this time of year?) I was pondering the design… and then realised as I was about to chuck the tube away that it might be the solution. A quick check showed it was just the right diameter to take the foams, and a new design was born. Before… and after:

Continue reading

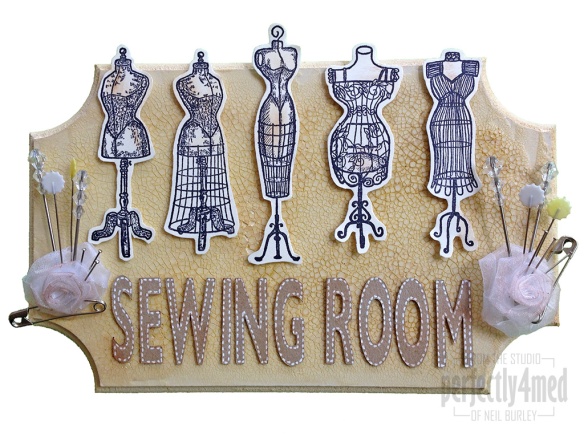
Sewing Room Door Plaque (for Creative Expressions)

Sewing Room Door PlaqueAnother of my projects featuring Creative Expressions’ Antique Dressform stamp set. This one is sporting a few embellishments that I wouldn’t consider to be my normal style, but the ribbon roses (also from CE) matched the theme perfectly and made a great pin cushion for the various pins I nicked from my quilting stash. No step-by-step photos this week, but there’s still a kit list and instructions for those that want them:

Continue reading

CC102: Day 1

Day 1: Distress PaintsThe longer-term followers of this ‘ere blog will probably vaguely remember that I did Tim Holtz’s Creative Chemistry 101 online class last year. He’s only gone and started CC102 today – there’s thirty more techniques he’s sharing – and of course I had to sign up. So here’s Day 1: six things to do with Distress Paints. I’m not allowed to share the techniques, but you won’t need to look far elsewhere on my blog to see where I have used them with conventional acrylics. That is, all but the first – the marbling effect is unique to Distress Paints because of their make up.


Experimental Stencil Tag

Experimental Stencil Tag


I took a little time out from enjoying the [rare] sunny weather today to put together this experimental tag. I used the Random Circles mask from Tando Creative to deboss the circles – inked up with Spiced Marmalade Distress Ink, embossed onto a pre-decorated tag from my stash, and then covered with Vintage Photo Distress Powder for that authentic rusted look. I used the same mask to select areas of cardstock from the Tim Holtz Lost and Found stash and then stitched them onto the tag using my machine – stitching on card seems to be a bit trickier than into fabric! I aged all the edges with Vintage Photo Distress Ink. A few TH cogs and sprockets, and various metal embellishments decorated with Distress Paints are then added with brads before adding the florist ad from the TH stamp set. A bit of unravelled jute string finished the tag off nicely. Not really my normal style, but hey, that’s what experimentation is about 🙂


Handmade tag book

Over the last couple of days I have been putting together this handmade book as a potential project for a gathering of some of the UK course graduates of the Creative Chemistry 101 online course with Tim Holtz. The cover is made from 100gsm paper dragged through Distress Paints, which has the bonus of being waterproof once dry. The lining was done the same way. The pages are folded from A5 printed sheets of paper and stuck down the opening edge with 3mm wide double sided tape to form the tag pockets. They are handsewn for binding before gluing the spine and sticking into the cover.The completed book contains 25 different #5 tags with the instructions, and I probably need to explore a concertina binding on the spine to account for this…

[Book dimensions: 31/4″x51/4″ (8cm x 13cm)]