They’re not tangle patterns… but they’re close!

Me again – I’ve survived a three day stint demonstrating and teaching at the NEC Hobbycraft exhibition, and it’s back to college and catch up time! Last week we were set loose to develop our own style in our drawing lessons, and I’ve returned to making repeating patterns from elements of my bead collection. Each of these patterns are A4 in size, in my sketchbook, and have been painted with black acrylic ink. They are all based on the same shapes which I have cut out from a preceding pattern, rearranged and then traced onto the page before block colouring. They’re not tangle patterns… but you could still use them in your zentangles…


Continue reading

College Term 4 – Jewellery – Week 6 – Part 2

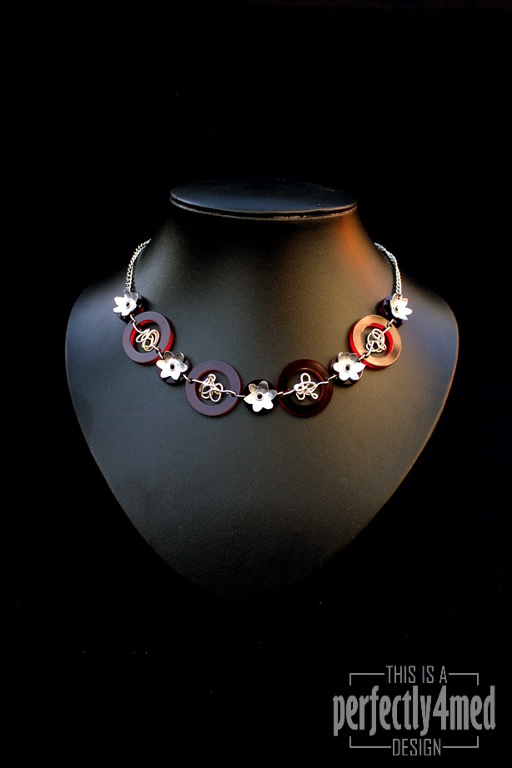
In a previous post you saw my aluminium and perspex necklace, bracelet and earring set. I also designed a second (bonus) piece using the offcuts from the perspex rings, and finished it today:

I’ve added silver wire tangles to the perspex rings. Each of the flowers were hand sawn from sheet aluminium and hammered into shape before being riveted onto the centre offcuts from the laser cut perspex rings. I’m planning to do two more flowers in the session tomorrow to complete a pair of matching earrings.

And I think I’m getting better at product photography! Rather pleased with the serendipitous lighting on this one – early morning in the conservatory with a bit of level tweaking in Photoshop. No artificial lights were used in the production of this image.

College Term 4 – Jewellery – Week 6

We’ve spent the last five weeks learning about the various ways of soldering (butt and sweat), cold joining with rivets, surface design (heat colouring, mill impressions, hammering) and playing with a laser cutter (I want one!). This week over five hours of lesson time, it was our time to make our own design – this is what I came up with:

Each of the metal discs were cut by hand from aluminium sheet, hammered to give texture, and wire brushed to make matte. I designed the acrylic flowers and circles to scale in Adobe Illustrator and these were cut from 3mm acrylic sheet on the laser cutter. They are attached to the aluminium discs using 2mm chenier tube rivets – several had to be done again as I was a little heavy handed at the beginning and cracked the acrylic. Links are commercial jump rings, as is the chain – time pressures didn’t allow me to make my own. Not that I’d know where to start making chain! I’m really pleased with the result, and aside from the laser cutting, all the techniques are feasible in a home studio.

College Term 4 – Painting – Week 4

More painting mayhem this week – this time we had to work large… very large! This painting is A1 size, with the viewframe being 4.3x3cm. I completed this in about two and a half hours, in acrylics, mixing colours from primaries and white. The rose bead and the filigree bead need a little more work, but I didn’t think it was too bad overall.

Dabber Resist Mixed Media Canvas

One of the techniques taught in the Creative Chemistry 101 class with ‘Professor’ Holtz was a dabber resist – taking advantage of the fact that acrylic paint is waterproof when dry. Here’s a canvas I put together over the bank holiday weekend making use of the technique, and how I did it follow after.

Continue reading

Paper Daisies

Apparently hospitals don’t allow flowers to be brought in any more. Presumably greenfly are in danger of spreading MRSA around as they don’t sanitise between flowers? Any how – this lead to a request to make some paper flowers to take instead. And here they are. Using the large daisy punch, I sandwiched a whorl of florists wire between two cardstock daisies, stuck down with Glossy Accents. The centres were then layered with yellow six-petal flower punch, then a brown cardstock one inch sun punch before topping off with a disc of Liquid Pearls. Some petals were scored with small embossing tool, others were curved by pressing around a narrow cylinder. Rather pleased with the outcome, and so was my friend 🙂

Gelatin(e) Printing – test run

It’s been a busy morning – very creative vibes. I was reading about gelatin(e) printing yesterday afternoon, and set a gelatine gel plate overnight. I managed to get the sheet more or less intact out of the baking tray using a smidge of hot water round the base and sliding it onto a glass mat. And these are the results of my first play 🙂

Continue reading

Paper Towel Printing – for art journals and backgrounds

I’ve been playing today 🙂  And one of the things I got playing with was a paper towel. I originally planned to dye it with acrylic paints/inks for decoupaging into my art journal. But one thing led to another, and before long, I’d ended up with what I think to be a totally novel technique – at least I haven’t seen it in all my hours browsing art journal techniques online. I’ll be calling it Paper Towel Printing, and this is the result:

Continue reading

Art Journaling – napkin decoupage

I’m discovering art journaling, and so far am just doing the backgrounds. Today I tried ‘napkin decoupage’ – taking the printed layer off a two or three ply napkin and then using a matte gel multi-medium sticking it to the page. So here’s the result! The rose image is from a napkin (Cath Kidston,John Lewis) and the rest is acrylic paint applied with a baby wipe into my Moleskine sketch book – I gesso’d the page first. The large burgundy area next to the rose image resulted from the page delaminating under gesso and heat and the top layer of the page peeling off leaving a much more absorbent core exposed. Adds to the distressed look.