Martha Stewart Craft Paints on Ceramic/Glass

I had an ‘interesting’ day yesterday at the fantastic Coleman’s Craft Warehouse Big Demo Day. I was billed to do a make and take with the Martha Stewart Craft Paints on Ceramics, but there was an unexpected influx of young children which resulted in me being asked to lead a children’s party next week! (I declined!)

That said, I’d done plenty of preparation for the make and take and here are pics of my samples. The plates are technique samplers and the text is written with a porcelain marker. All of the samples were baked, and are dishwasher safe – I actually tested this claim before I agreed to promote the paints, and I can absolutely say it does what it says it will do! The paints are more adherent than most acrylics I’ve used, and though water based, the box says not to mix with water – I presume this messes about with the resin technology that makes them multi-surface. You can thin the colour with the glaze product that is in the same range of products, which is how I managed to get the wood grain effect on one of the mugs using a brush. I would recommend applying the paint with a sponge onto non-porous surfaces and you can use a heat gun to make a layer workable, although it is not as stable as if left for an hour or so to dry between coats. The frosted glass effect paint is also applied with a sponge and is one of the most user-friendly frostings I’ve ever come across.

The paint itself is a creamy consistency, dabs on well and has good opacity. It comes in four varieties – a Satin Finish which seems more matte to me, a pearlescent – which is striking, a glitter – which is more of a coloured glitter translucent glaze, and a high gloss. The colour range available is comprehensive and there are various special effect bottles that I haven’t had the opportunity to play with.

I’m particularly impressed with the range of accompanying accessories, including the fine applicator tip that attaches to the bottle (see the high gloss black outlining) and the sponge dabber tips that do the same. Ms Stewart has also included an empty bottle in the pack which is for rinsing out the caps when done with clean water. Clean up is easy – as long as you do it while the paint is still damp. The paint by its nature sticks firmly and to any surface. I found that the stencils retained paint even after cleaning quickly after use, but any dried paint didn’t shift with subsequent applications.

To be honest, I’d probably use other acrylics for painting porous surfaces, but I’d certainly recommend these craft paints for any non-porous surface.

WOW! with a bit of Creative Chemistry 101

I’m up early, all excited about my stint at Hobbycrafts at the NEC, Birmingham today and tomorrow on the WOW! Embossing Powders stand. They have just brought out some silicone moulds – come and see the jewellery pieces I’ve made (I’ll pop them on here next week when I have a moment). Also created last night using their new embossed resist card with inspiration from the Creative Chemistry 101 Day Five teaching on Distress Stains comes this little (8x20in) sampler for the show:

WOW! Butterflies in flight

I spent the evening yesterday slaving over a hot oven… though 160 C is probably a moderate oven thinking about it. I was baking butterflies – not as cruel as it sounds, as they were made from embossing powder. I spent more time tying the darn things together than making them, but judge for yourself whether the results were worth it:

Continue reading

Unique Giveaway #3 – four days to go

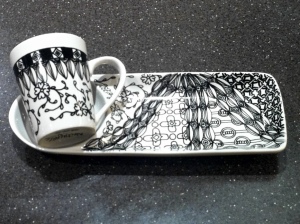
Just a little reminder to those that haven’t entered yet, I’m giving away this mug and fancy saucer set hand-decorated with my own tangle designs. Entry is by commenting anywhere on my blog between now and midnight GMT on my birthday, Friday 10th February. I’ll draw the winner on Saturday 11th February and announce it here on my blog. Good luck! [If you’ve already entered, you’re welcome to make more comments, but you’ll only be entered into the draw once.]

Self-closing box instructions

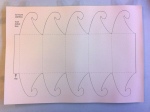
Following several requests (well, at least one!), here are instructions for making my self-closing box using the printable template on my Template page.

Either print or trace the outlines from the template onto a sheet of A4 card (at least 160gsm recommended)
Cut round the solid lines
Using a scoring blade in your personal cutter, or an embossing tool or other scoring technique of your choice, score the dotted lines
Crease all the scored lines, folding upwards. Add a strip of double sided tape to the underside of the tab (red strip in photo)
Stick down the tab to the inside (printed) side of the last (right hand) section of the box, to make a pentagonal cylinder
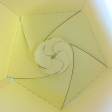
The tags tuck under one another to close the box – you should end up with a nice swirl. To unlock, just pull one of the hooks from the rest. By doing the same top and bottom, you can create a horizontal box like the centre of a Christmas Cracker
If you want a vertical standing box, try tucking the hooks toward the inside of the box – this is tricky and fiddly, but gives this smooth bottom closure
And this is what it would look like on the inside.
Hope this helps! If you want a video version of this, then I’ll point you toward my Amazon wish list so you can get me the webcam I’d like to set up video tutorials 🙂

Wow! A Mother’s Day Bouquet

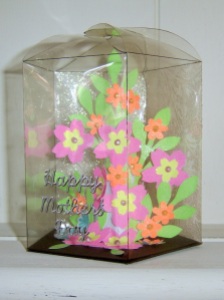
I’ve posted another project over at Wow! Embossing Powder blog as part of their design team. This time I have designed a bouquet in a perfectly formed custom gift box, making use of the February fluorescent theme colours. Pop over for the instructions.

Templates and instructions for the box can be found on my new Templates page – look in the toolbar above, or click here.