When you can’t get leather… try grungepaper!

Hi – this morning has been spent on a commission. I have been asked to wear something I have made using WOW! Embossing Powder when I’m demonstrating at the NEC next week [Hobbycrafts Exhibition, stand M12-15]. Though I didn’t immediately dismiss necklace or earrings, I didn’t think I’d enjoy the ear lobe crushing of a clip on, and necklaces just dangle in the melt pot… So I came up with two ‘man bracelets’:

Both bracelets are made from grungepaper coloured with Vintage Photo and Walnut Stain distress inks, embossed using Tim Holtz texture fades embossing folders, stuck down with Studio matte multi medium. Sewing reinforces the whole thing and the fastening is a Tim Holtz copper hitch. Bracelet 1 features the new WOW! Special Edition Embossing Glitters (Caribbean Jewels) due to be launched at the NEC. Bracelet 2 (The Other Wrist) features the WOW! metallic embossing powders. Grungeboard would work as well, but I didn’t have a size that wrapped round my wrist!

Pearlised custom patterned card

The design challenge over at WOW! Embossing Powder blog this month is ‘monochromatic’ and featuring their fabulous pearlescent powders. This is what I came up with, and if you’d like to find out how I made the pearlescent background card/gift box lid pop over and read my post.


Ceramics – Exhibition Piece

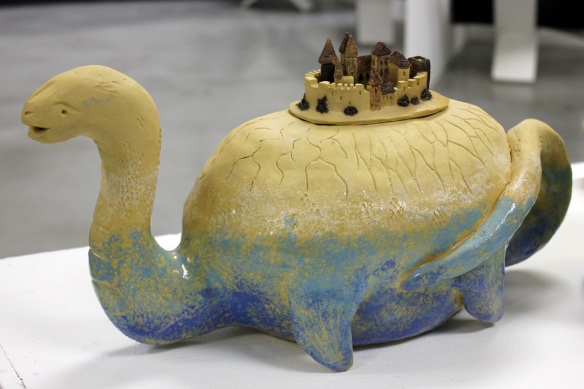
As regular readers will know by now, the last term’s work at college has been based on an artist of our choosing – mine is the Polish fantasy/surrealist Jacek Yerka. For our ceramics module this term we had to design and make a functional teapot based on our artist’s work.

This first image shows my three designs that reached maquette stage: I dubbed them ‘Time Flies’, ‘Town in a Teacup’ and ‘Brontosaurus Civitas’ – click on the links to see the original images on which they are based.

As you can see, it was worth doing the test run, as the Brontosaurus exploded on firing as I’d not left a big enough hole leading to the pot void… All would make functional tea pots, with the ring pot being the most striking, but trickiest to make. I decided to go for the quickest to make, and my original idea, as time was limited to get the pot finished, fired and glazed before exhibition night. Here’s the final pot – a little on the large size to be practical, but fully functional. The town is a close fitting lid, and decorated with various oxides. The main pot is internally glazed and decorated with slips and part glazed to give the impression of the monster being in water with cliffs leading up to the town. I think I prefer working small, as I’m far happier with the town than the pot!

Mixed Media – Exhibition Piece

It’s been a while again since I’ve posted – I’ve been busy finishing off end of year projects at college, culminating in our exhibition last night. Here’s just one of my pieces (I’ll share some more in a couple of days), for the final mixed media module, inspired by the work of Jacek Yerka, my ‘chosen’ artist for this term.

Continue reading

Dabber Resist Mixed Media Canvas

One of the techniques taught in the Creative Chemistry 101 class with ‘Professor’ Holtz was a dabber resist – taking advantage of the fact that acrylic paint is waterproof when dry. Here’s a canvas I put together over the bank holiday weekend making use of the technique, and how I did it follow after.

Continue reading

Yellow Flowers and a White Frame

It’s ‘Less is More’ challenge entry time again, and this week, being the first in the month, it’s a colour theme: yellow. I had in mind for last week’s sketch challenge to do a frame with 3D flowers in, but didn’t end up having enough time to make it. So here’s the same plan, with yellow flowers!

Continue reading

Three Shades of Green with a drop of yellow

It’s ‘Less is More’ challenge time again – and this week I’m a little earlier than I have been for the last couple of times! The first week of the month theme is colour, and they’ve set the task of creating a clean and simple card with three shades of green. I used the Hero Arts ferns set of stamps, and Shabby Shutters, Peeled Paint and Forest Moss Distress Inks. A spritz of water, punched flowers and a few drops of liquid pearls and here’s my entry:

Twelve Tags for 2012 – May


I’ve just finished designing my fifth tag in my Twelve Tags for 2012 series. This one features a distress stain background using techniques I learnt on my recent Tim Holtz’s Creative Chemistry 101 course, as well as air dry clay Lily of the Valley flowers. I love it when a plan comes together – I couldn’t find a stamp that I liked enough, so this was Plan B and I am rather pleased with the outcome, even if I do say so myself! I’ll be demonstrating how to make it and an accompanying card at the Manic Stamper Craft Club on 21st April. Instructions on how to make the tag are now available here.