


I love a decent crackle effect, but it’s a notoriously difficult thing to get ‘right’ and nigh on impossible to get the same results every time. I noticed I have collected many different crackle effect mediums over time, and thought it was time to do a side-by-side trial.
The trial conditions were as follows:
- Each tile is 5mm thick foam core, cut to 3⅝” square
- Each was coated with a single coat of Amsterdam Standard Titanium Buff Light acrylic paint and allowed to dry completely
- Manufacturer instructions were then followed for each medium
- Once the crackle effect was complete and dry, the tile was rubbed over with Vintage Photo Distress Stain to get colour into the cracks, and then cleaned off the surface with kitchen paper before wiping over with a wet wipe
- The surface was then wiped over with a wet wipe dipped in the acrylic paint and then allowed to dry.
- Each tile was scanned at 300dpi, and then reduced in Photoshop to 72dpi for the web, with no other digital editing done.
The mediums on test were:
A) Schjerning Effekt Crackle (from Creativ Company)
A two-step crackle – apply a layer of step one and allow to dry for approx. one hour before putting on step two, and allow to dry for over 24 hours. Both steps are white gels that dry clear and are easy to apply with a brush. Water clean up.
B) Viva Croco Crackling Colour Transparent (from Creativ Company)
Single-step crackle white gel/cream which dries clear. Applied with a palette knife. Requires at least 24 hours to dry, depending on the thickness of the application. Water clean up.
C) Ranger/Tim Holtz Rock Candy Distress Crackle Paint
Single-step crackle, clear gel. The application brush included in small jars unhelpfully doesn’t reach the bottom of the pot; larger, brushless jars are available. Applied with a palette knife. Drying time varies; I left mine overnight. Can only be heated once crackling developing aroundthe edge. Water clean up.
D) PVA Glue
Single-step crackle: spread a layer of PVA glue over the tile, then paint on a layer of acrylic paint over the wet glue. Allow to dry completely (overnight). Can be heated to speed up the process, but take care not to overheat. Water clean up.
E) Aleene’s Quick Crackle
Two-step crackle – apply a layer of the clear liquid medium with a paintbrush. Self-levelling. Allow to dry completely, for more than a couple of hours. I left mine overnight. Paint over with acrylic paint, and the crackle develops as it dries. It can be heated to speed up the process, but take care not to overheat. Water clean up.
F) Ranger/Inkssentials Crackle Accents (added 13-JAN-14)
One step crackle – clear stiff gel that’s difficult to squeeze through the nozzle. Spreads well with either a brush or a palette knife. Crackle appears as it dries, successfully sped up with heat from the radiator. Water clean up.
G) Golden Crackle Paste (added 25-FEB-14)
One step crackle – opaque white paste that spreads well with a palette knife. Crackle appears as it cures – takes up to three days, variable with relative humidity and temperature. Water clean up.
H) Vallejo Crackle Medium (from Jackson’s Art) (added 25-FEB-14)
One-step crackle: clear liquid, easy to apply with a brush, self-levelling. Cracks as it dries. Water clean up.
I) DecoArt Perfect Crackle (Two Step) (added 17-MAR-14)
Two-step crackle – apply the second step over almost dry first coat. Clear transparent crackle, with crack size dependent on the layers of each step used. Easy to apply with a soft brush, water clean up.
J) Wendy Vecchi/Dreamweaver Crackled Texture Paste (added 17-MAR-14)
One step white opaque paste, apply with a palette knife. Crackle appears as it dries. Water clean up.
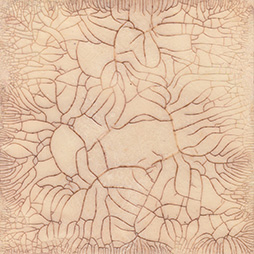
THE RESULTS
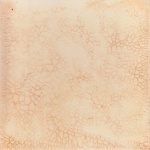
 A) Effekt Crackle
A very shallow, fine crackle from thin layers. Some erosion with wet rubbing, otherwise takes additional mediums well. No directional bias.
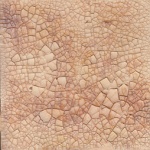
 B) Croco
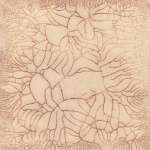
A deep, varied, coarse crackle. No erosion, but some chipping with subsequent layers. Caused delamination of foamboard due to shrinkage (rectified with superglue). Takes additional mediums well. No directional bias.
 C) Distress Crackle
A medium depth, varied, coarse crackle. No erosion with rubbing, but some chipping with subsequent layering. Caused slight delamination of the foamboard, but not as much as with Croco – may be a thinner layer. Takes subsequent mediums well. No particular directional bias.
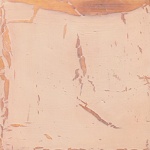
 D) PVA
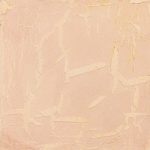
A shallow, minimal crackle. No erosion or chipping with subsequent layers. PVA takes stain well, other layers cover well. Directional bias along brush strokes.
 E) Aleene’s
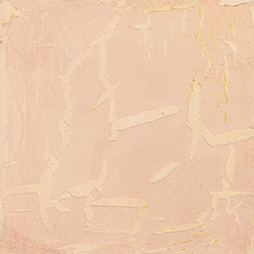
Shallow, very coarse crackle. Poor adherence of uppers layers to crackle medium. Subsequent layers do not stick to crackle medium – so cracks do not stain. Directional bias along brush strokes.
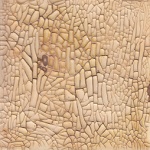
 F) Crackle Accents
Defined cracks, variable depending on depth of application. No erosion with rubbing, or chipping off. No delamination of foamboard. Took subsequent layers well.
 G) Golden Crackle Paste
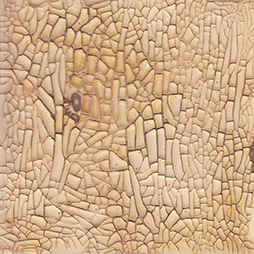
Very coarse crackle with defined cracks, variable depending on the depth of application. Porous opaque finish which ‘sands’ off under finger rubbing, and does not allow layer beneath to show through. No delamination of foamboard. Will need sealing.
 H) Vallejo Crackle Medium
Fine crackle, dependent on the depth of application. Thicker areas have considerable pull, enough to pull the underlying acrylic off the foamboard in the centre. Also flakes off when rubbed with distress ink applicator tool.
 I) DecoArt Perfect Crackle (Two Step)
Good variable crackle, shallow cracks which take the distress ink well. Transparency allows underlying colours through. Firmly adherent.
 J) Wendy Vecchi/Dreamweaver Crackled Texture Paste
Good variable crackle, with small islands between cracks. Porous, so absorbed a lot of the distress ink – may have benefited from acrylic paint application first. Will need sealing. Does not seem to erode with rubbing like the Golden Crackle Paste.
[And for the grammar purists, I might have used ‘media’ as the plural of ‘medium’ throughout this post, but decided for clarity to use the equally acceptable ‘mediums’. More info here.]
the deco art crackle are brilliant, thay have a one and two step one and they are yummy! 😉
good to see a side by side picture of the mediums use as personally I have not had a lot of success so will now try again,
I’m going to add another later – forgot I had some Inkssentials Crackle Accents!
Hello, thank you for the post, it is very useful. I have only tried the Golden Crackle paste and found it to be fun but tricky to use, mostly because of the sanding effect. After reading your post I think I will experiment with one of the others.
Thank you do much – I have – decoart perfect crackle & inkessentials crackle accents – wasn’t sure which to use this really helped and now there’s a couple more I want to try! Really appreciate this