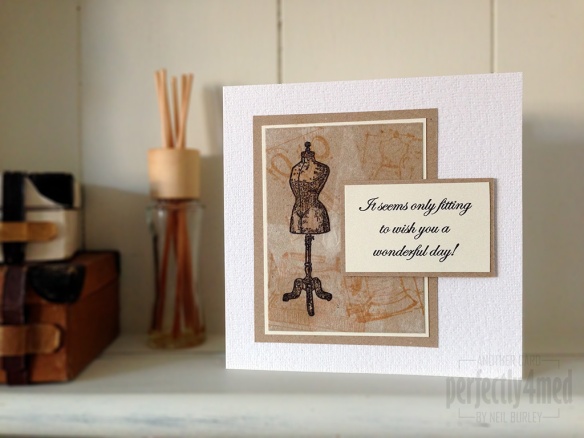
 The other stamp pack I have been sent to work with this month for the Creative Expressions Design Team projects is their unmounted ‘Antique Dressforms’ set. This card features a decoupaged background which I hope is reminiscent of tissue paper dress patterns, and is a relatively quick and easy make.
You will need:
Creative Expressions Antique Dressforms unmounted stamp set
Tim Holtz/Stampers Anonymous Mini Blueprints 3 (CMS150) stamp set
Cosmic Shimmer Specialist Acrylic Glue
Foundations A4 Card: Kraft/Milk
Ranger Archival Ink: Jet Black
Ranger Distress Inks: Tea Dye/Walnut Stain
Studio Multi-medium: Matte
Inkssentials Craft Nibs
Inkssentials Craft Nib holder (optional)
- Using the four sewing themed stamps from the Mini Blueprints set, stamp each onto white tissue paper, a white tissue or the unprinted white layer of a three-ply napkin using Tea Dye Distress Ink. Using a thin paint brush wet with clean water, run lines around the images and tear apart from each other – the water softens the fibres resulting in a predictable tear line and a fuzzy edge which blends better when collaged. Take care not to get water on the distress ink as it will probably run.
- Next, cut a piece of Kraft card to 3×4″ and cover with a thin layer of matte multi-medium using a wide soft paintbrush. With a little multi-medium still on the bristles, smooth down one of the images on to the card and cover completely – as the medium soaks through the tissue will become translucent. If you have too much medium underneath, or too little on top, the brush is likely to catch and tear the tissue. Repeat for all four images, layering them over each other. Dry off, preferably naturally. You can use a heat tool, but take care not to overheat as this may cause bubbling and lifting of the tissue.
- Once dry, either trim off the excess tissue, or repeat the gluing process on the back side by folding round the tissue and dry completely.
- Print one of the dressforms from the Antique Dressforms set onto the collaged tissue using Jet Black Archival Ink. Dry off with a heat tool. Using the craft nib and holder, add shading to the dressform picking up ink from the Tea Dye and Walnut Stain ink pads. If you want to blend the colours, dry off the nib onto kitchen paper and then use the nib to blend on the collage. The multi-medium layer will not absorb the ink, so it will remain wet for longer, and will require drying time/heat setting.

- Using Cosmic Shimmer Acrylic Glue, mount onto Milk card, then another piece of Kraft card. Print the sentiment onto Milk card using the Jet Black Archival Ink, mat onto Kraft card and then mount everything onto a suitable card using glue and foam pads.


