Bible Journaling: some Old Testament goodies (BJ-27)

Well, this evening’s Bible Journaling Session was due to take its inspiration from some Old Testament verses. Unfortunately, not enough people could attend today and the session has been postponed to Monday, 8th April. For those unfamiliar with Bible Journaling, using the provided templates and examples participants trace and colour into their own wide-margin Bibles, reflecting on the verse as they do so. There’s also a lot of space for chat, catching up and not forgetting a cup of tea/coffee/hot chocolate. The sessions are monthly, cost £5, and are suitable for artists and non-artists alike. More details are on my workshops page or by getting in touch with me. This month’s choice of illustrations are pictured below, and the templates are available as a free download from my online shop.

Continue reading

Bible Journaling: Colour Challenge (BJ-26)

For the first Bible Journaling Session of 2024, we’re having a colour challenge. All of us have our favourite colours that we reach for… Sometimes we can get stuck choosing new palettes and our work becomes a little samey. During our session, we will use different colour palettes to try and break out of our tonal rut. Here are my samples – carry on reading to see the colour palettes I used.

Continue reading

Bible Journaling: By request (BJ-22)

I’m a bit behind on posting my Bible journaling templates, sorry about that. First up, last month’s session was based on verses that were ‘by request’. I received four nominated verses and chose the last to complete the set. I also admit to rejigging one of my older templates, so you may recognise it.

Continue reading

Bible Journaling: Easter 2023

I was asked to prep some templates and samples on an Easter theme during my regular Bible Journaling session last month. I did so yesterday and today, and we will be using mixed media techniques on Monday to create one or more of these illustrations in your journaling Bible. I’ve tried to choose verses that might not be immediately the first you’d go to, and that show the sadness and joy of the event. I hope my colour palettes reflect those emotions too. As always, the templates are freely available to download via the shop link in the menu bar above. Here are my new journaled illustrations:


Continue reading

Trimcraft Maker: Modern Floral Dress

Back when I was a Craftwork Cards design team member, I came up with a dress form for a papier-mâché torso and it sort of became my trademark make. When thinking of a final project to finish off my decoupage papers, it came to mind to make another, and what better design to use than the Modern Floral?

modern floral dressThe dress follows the template available for purchase here. Unfortunately, the torso I use is no longer available from Creativ Company, but may be available elsewhere. I recommend using patterned paper rather than decoupage paper which was a little fragile for all the proper folding.

First Edition Deco Maché Modern Floral decoupage paper is available from Craft Stash.

Self-closing box instructions

Following several requests (well, at least one!), here are instructions for making my self-closing box using the printable template on my Template page.

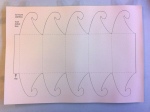
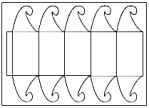
Either print or trace the outlines from the template onto a sheet of A4 card (at least 160gsm recommended)
Cut round the solid lines
Using a scoring blade in your personal cutter, or an embossing tool or other scoring technique of your choice, score the dotted lines
Crease all the scored lines, folding upwards. Add a strip of double sided tape to the underside of the tab (red strip in photo)
Stick down the tab to the inside (printed) side of the last (right hand) section of the box, to make a pentagonal cylinder
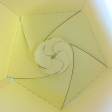
The tags tuck under one another to close the box – you should end up with a nice swirl. To unlock, just pull one of the hooks from the rest. By doing the same top and bottom, you can create a horizontal box like the centre of a Christmas Cracker
If you want a vertical standing box, try tucking the hooks toward the inside of the box – this is tricky and fiddly, but gives this smooth bottom closure
And this is what it would look like on the inside.
Hope this helps! If you want a video version of this, then I’ll point you toward my Amazon wish list so you can get me the webcam I’d like to set up video tutorials 🙂

New ‘Templates’ section

In readiness for my next Wow! Embossing Powders project, I’ve added a new section to my blog to hold a library of templates that I have used over the years. The first to appear are a self-closing box and base that I designed to be made from a sheet of A4 in acetate, though it would work well enough in card too. Please have a peek, using the link on the toolbar under the blog title, and let me know if I need to add any assembly instructions!