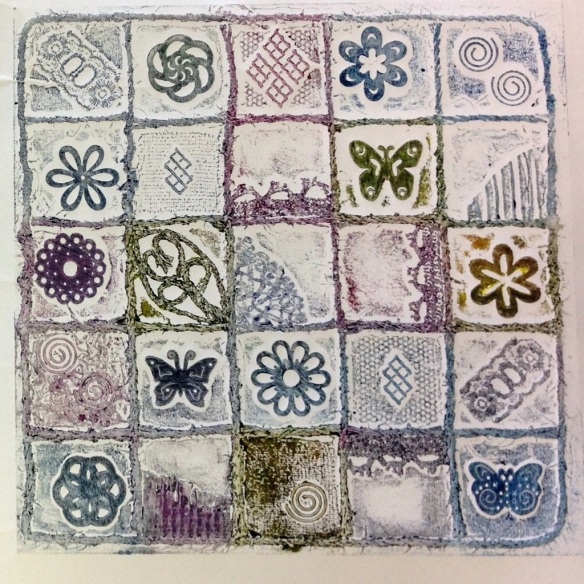
It’s collograph technique time – who would think that a few bits and pieces stuck down and flooded with dilute PVA, dried and inked could make fabulous prints? Here’s a pic of the collagraph plate after a few prints:

And here’s one of the prints:
It’s collograph technique time – who would think that a few bits and pieces stuck down and flooded with dilute PVA, dried and inked could make fabulous prints? Here’s a pic of the collagraph plate after a few prints:
And here’s one of the prints:
Me again – I’ve survived a three day stint demonstrating and teaching at the NEC Hobbycraft exhibition, and it’s back to college and catch up time! Last week we were set loose to develop our own style in our drawing lessons, and I’ve returned to making repeating patterns from elements of my bead collection. Each of these patterns are A4 in size, in my sketchbook, and have been painted with black acrylic ink. They are all based on the same shapes which I have cut out from a preceding pattern, rearranged and then traced onto the page before block colouring. They’re not tangle patterns… but you could still use them in your zentangles…

In a previous post you saw my aluminium and perspex necklace, bracelet and earring set. I also designed a second (bonus) piece using the offcuts from the perspex rings, and finished it today:
 I’ve added silver wire tangles to the perspex rings. Each of the flowers were hand sawn from sheet aluminium and hammered into shape before being riveted onto the centre offcuts from the laser cut perspex rings. I’m planning to do two more flowers in the session tomorrow to complete a pair of matching earrings.
And I think I’m getting better at product photography! Rather pleased with the serendipitous lighting on this one – early morning in the conservatory with a bit of level tweaking in Photoshop. No artificial lights were used in the production of this image.
We’ve spent the last five weeks learning about the various ways of soldering (butt and sweat), cold joining with rivets, surface design (heat colouring, mill impressions, hammering) and playing with a laser cutter (I want one!). This week over five hours of lesson time, it was our time to make our own design – this is what I came up with:
 Each of the metal discs were cut by hand from aluminium sheet, hammered to give texture, and wire brushed to make matte. I designed the acrylic flowers and circles to scale in Adobe Illustrator and these were cut from 3mm acrylic sheet on the laser cutter. They are attached to the aluminium discs using 2mm chenier tube rivets – several had to be done again as I was a little heavy handed at the beginning and cracked the acrylic. Links are commercial jump rings, as is the chain – time pressures didn’t allow me to make my own. Not that I’d know where to start making chain! I’m really pleased with the result, and aside from the laser cutting, all the techniques are feasible in a home studio.
Yes, I know, there’s a week or so missing from the ceramics thread – I’m waiting on some of the things I’ve been making to get fired in the kiln so you can see the before and after. This week, amongst other things, we were invited to play and experiment with extruded clay. Here’s my (unfired) tile with my experimentations:

From top, all extruded shapes:
1) Twisted trefoil
2) Square, alternating full and half-slices
3) Square, pierced and cut
4) Trefoil, pinched and dented
5) Trefoil, sliced and indented
6) Trefoil, pinched and dented
7) Square, irregular slice, end on
8) D-profile, coiled
9) D-profile, plaited
10) D-profile, stamped with biro lid and nib
11) D-profile, pressed with curved edge of serrated kidney tool.
More painting mayhem this week – this time we had to work large… very large! This painting is A1 size, with the viewframe being 4.3x3cm. I completed this in about two and a half hours, in acrylics, mixing colours from primaries and white. The rose bead and the filigree bead need a little more work, but I didn’t think it was too bad overall.

Well, the Mac is currently reinstalling from back up – silly me decided to do that over the network, so there’s another day to go! Meanwhile, back in real time, I took more photos of the oil paintings from week 2 (the first three) and one from week 3. Each painting is 15cm square based on a 3cm square frame of my bead collection. We were working in brown monotone, making our browns using colour theory: blue and yellow to make green, green and red to make brown, add blue to darken, yellow to lighten and be careful with the white! A small amount of the light brown mixed with white made the background cream. I reckon I was getting much better by number 4… Let me know how you think I did!
This is the last post based on my end-of-first-year exhibition pieces. Today’s is the graphics and illustration project – we had four sessions to create a collage based on the portrait and work of our chosen artist. I developed several collages, based on thumbnail images of the myriad works of Jacek Yerka, courtesy of a Google search. The two I chose to take forward were a simple cut and paste montage of as many thumbnails that would fit on an A4 sheet, and a number of thumbnails mounted on acetate hoops circling an image of the artist photocopied from one of his books (to represent his images being inspired by his dreams). I then researched and mocked up a magazine cover and article (based on Artists and Illustrators March 2012 magazine) and a book cover dust jacket using a photo of the 3D whirling dreams montage and a scan of the A4 montage.


This is another of my end-of-first-year exhibition pieces, this time for the four week still life module. It is white oil pastel and graphite on black paper, and took around four hours to complete. The items were all drawn separately and then grouped together for the piece with a single light source chosen. It was an exercise in creating ellipses which I now know are circles drawn in perspective!
